.
QGIS as OGC Data Server
QGIS Server is an open source WMS 1.3, WFS 1.0.0 and WCS 1 1.1.1 implementation that, in addition, implements advanced cartographic features for thematic mapping. The QGIS Server is a FastCGI/CGI (Common Gateway Interface) application written in C++ that works together with a web server (e.g., Apache, Lighttpd). It has Python plugin support allowing for fast and efficient development and deployment of new features. It is funded by the EU projects Orchestra, Sany and the city of Uster in Switzerland.
QGIS Server uses QGIS as back end for the GIS logic and for map rendering. Furthermore, the Qt library is used for graphics and for platform-independent C++ programming. In contrast to other WMS software, the QGIS Server uses cartographic rules as a configuration language, both for the server configuration and for the user-defined cartographic rules.
As QGIS desktop and QGIS Server use the same visualization libraries, the maps that are published on the web look the same as in desktop GIS.
In one of the following manuals, we will provide a sample configuration to set up a QGIS Server. For now, we recommend to read one of the following URLs to get more information:
- http://karlinapp.ethz.ch/qgis_wms/
- http://hub.qgis.org/projects/quantum-gis/wiki/QGIS_Server_Tutorial
- http://linfiniti.com/2010/08/qgis-mapserver-a-wms-server-for-the-masses/
Sample installation on Debian Squeeze
At this point, we will give a short and simple sample installation how-to for a minimal working configuration using Apache2 on Debian Squeeze. Many other OSs provide packages for QGIS Server, too. If you have to build it all from source, please refer to the URLs above.
Firstly, add the following debian GIS repository by adding the following repository:
$ cat /etc/apt/sources.list.d/debian-gis.list
deb http://qgis.org/debian trusty main
deb-src http://qgis.org/debian trusty main

$ # Add keys
$ sudo gpg --recv-key DD45F6C3
$ sudo gpg --export --armor DD45F6C3 | sudo apt-key add -

$ # Update package list
$ sudo apt-get update && sudo apt-get upgrade
Now, install QGIS-Server:
$ sudo apt-get install qgis-server python-qgis
Installatie van een voorbeeld plug-in HelloWorld voor het testen van de servers. U maakt een map waarin de plug-ins voor de server koken te staan. Dat zal worden gespecificeerd in de configuratie van de virtual host en worden doorgegeven aan de server door middel van een omgevingsvariabele:
$ sudo mkdir -p /opt/qgis-server/plugins
$ cd /opt/qgis-server/plugins
$ sudo wget https://github.com/elpaso/qgis-helloserver/archive/master.zip
$ # In case unzip was not installed before:
$ sudo apt-get install unzip
$ sudo unzip master.zip
$ sudo mv qgis-helloserver-master HelloServer
Installeer de Apache server in een afzonderlijke virtual host luisterend naar poort 80. Schakel de module rewrite in om HTTP BASIC auth headers door te kunnen geven:
$ sudo a2enmod rewrite
$ cat /etc/apache2/conf-available/qgis-server-port.conf
Listen 80
$ sudo a2enconf qgis-server-port
Dit is de configuratie voor de virtual host, opgeslagen in /etc/apache2/sites-available/001-qgis-server.conf :
<VirtualHost *:80>
  ServerAdmin webmaster@localhost
  DocumentRoot /var/www/html

  ErrorLog ${APACHE_LOG_DIR}/qgis-server-error.log
  CustomLog ${APACHE_LOG_DIR}/qgis-server-access.log combined

  # Longer timeout for WPS... default = 40
  FcgidIOTimeout 120
  FcgidInitialEnv LC_ALL "en_US.UTF-8"
  FcgidInitialEnv PYTHONIOENCODING UTF-8
  FcgidInitialEnv LANG "en_US.UTF-8"
  FcgidInitialEnv QGIS_DEBUG 1
  FcgidInitialEnv QGIS_SERVER_LOG_FILE /tmp/qgis-000.log
  FcgidInitialEnv QGIS_SERVER_LOG_LEVEL 0
  FcgidInitialEnv QGIS_PLUGINPATH "/opt/qgis-server/plugins"

  # ABP: needed for QGIS HelloServer plugin HTTP BASIC auth
  <IfModule mod_fcgid.c>
      RewriteEngine on
      RewriteCond %{HTTP:Authorization} .
      RewriteRule .* - [E=HTTP_AUTHORIZATION:%{HTTP:Authorization}]
  </IfModule>

  ScriptAlias /cgi-bin/ /usr/lib/cgi-bin/
  <Directory "/usr/lib/cgi-bin">
      AllowOverride All
      Options +ExecCGI -MultiViews +FollowSymLinks
      # for apache2 > 2.4
      Require all granted
      #Allow from all
  </Directory>
 </VirtualHost>
Schakel nu de virtual host in en start Apache opnieuw:
$ sudo a2ensite 001-qgis-server
$ sudo service apache2 restart
Test de server met de plug-in HelloWorld:
$ wget -q -O - "http://localhost/cgi-bin/qgis_mapserv.fcgi?SERVICE=HELLO"
HelloServer!
You can have a look at the default GetCpabilities of the QGIS server at: http://localhost/cgi-bin/qgis_mapserv.fcgi?SERVICE=WMS&VERSION=1.3.0&REQUEST=GetCapabilities
Tip
If you work with a feature that has many nodes then modyfying and adding a new feature will fail. In this case it is possible to insert the following code into the 001-qgis-server.conf file:
<IfModule mod_fcgid.c>
FcgidMaxRequestLen 26214400
FcgidConnectTimeout 60
</IfModule>
Creating a WMS/WFS/WCS from a QGIS project
To provide a new QGIS Server WMS, WFS or WCS, we have to create a QGIS project file with some data. Here, we use the ‘Alaska’ shapefile from the QGIS sample dataset. Define the colors and styles of the layers in QGIS and the project CRS, if not already defined.
Figure Server 2:
Definitions for a QGIS Server WMS/WFS/WCS project (KDE)
Then, go to the OWS Server menu of the
Project ‣ Project Properties dialog and provide
some information about the OWS in the fields under
Service Capabilities.
This will appear in the GetCapabilities response of the WMS, WFS or WCS.
If you don’t check  Service capabilities,
QGIS Server will use the information given in the wms_metadata.xml file
located in the cgi-bin folder.
Service capabilities,
QGIS Server will use the information given in the wms_metadata.xml file
located in the cgi-bin folder.
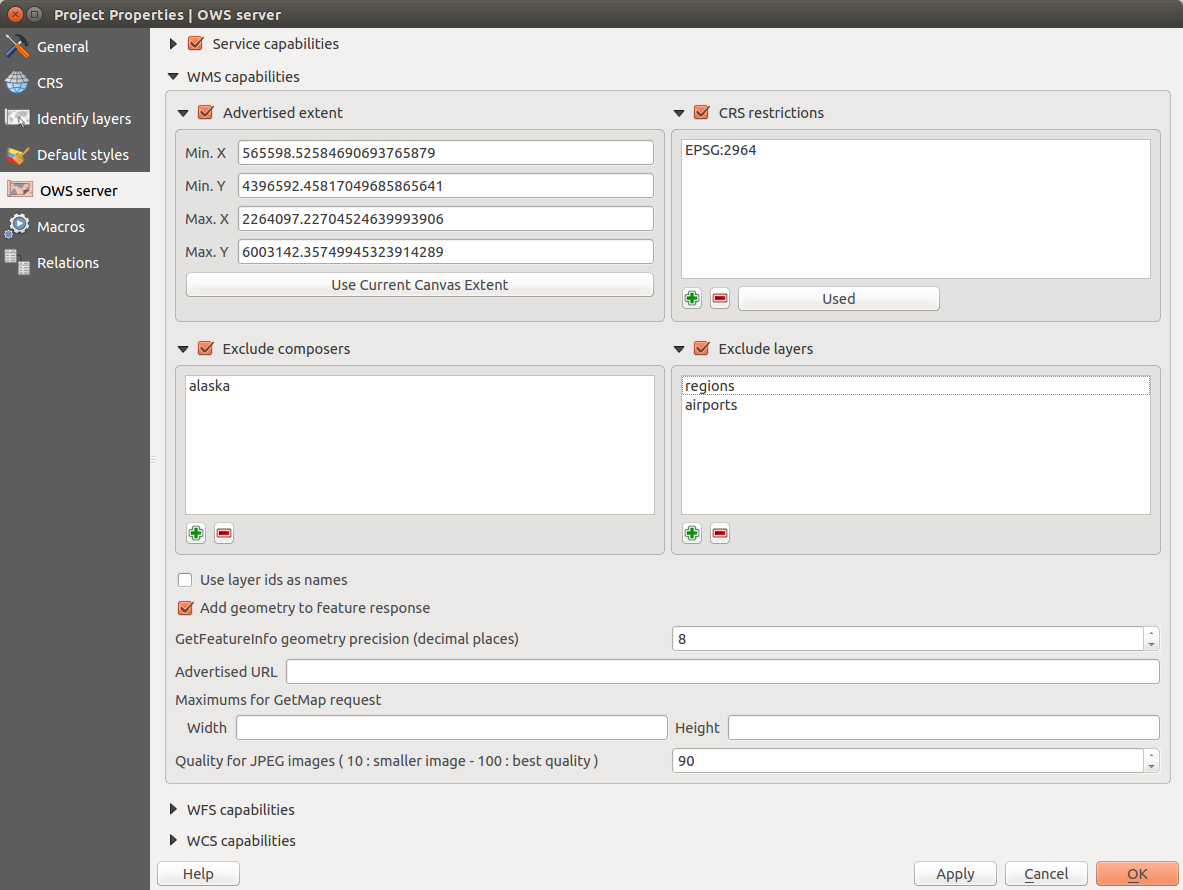
WMS capabilities
In the WMS capabilities section, you can define
the extent advertised in the WMS GetCapabilities response by entering
the minimum and maximum X and Y values in the fields under
Advertised extent.
Clicking Use Current Canvas Extent sets these values to the
extent currently displayed in the QGIS map canvas.
By checking CRS restrictions, you can restrict
in which coordinate reference systems (CRS) QGIS Server will offer
to render maps.
Use the  button below to select those CRS
from the Coordinate Reference System Selector, or click Used
to add the CRS used in the QGIS project to the list.
button below to select those CRS
from the Coordinate Reference System Selector, or click Used
to add the CRS used in the QGIS project to the list.
If you have print composers defined in your project, they will be listed in the
GetCapabilities response, and they can be used by the GetPrint request to
create prints, using one of the print composer layouts as a template.
This is a QGIS-specific extension to the WMS 1.3.0 specification.
If you want to exclude any print composer from being published by the WMS,
check Exclude composers and click the
button below.
Then, select a print composer from the Select print composer dialog
in order to add it to the excluded composers list.
If you want to exclude any layer or layer group from being published by the
WMS, check Exclude Layers and click the
button below.
This opens the Select restricted layers and groups dialog, which
allows you to choose the layers and groups that you don’t want to be published.
Use the Shift or Ctrl key if you want to select multiple entries at once.
You can receive requested GetFeatureInfo as plain text, XML and GML. Default is XML, text or GML format depends the output format choosen for the GetFeatureInfo request.
If you wish, you can check Add geometry to feature response.
This will include in the GetFeatureInfo response the geometries of the
features in a text format. If you want QGIS Server to advertise specific request URLs
in the WMS GetCapabilities response, enter the corresponding URL in the
Advertised URL field.
Furthermore, you can restrict the maximum size of the maps returned by the
GetMap request by entering the maximum width and height into the respective
fields under Maximums for GetMap request.
If one of your layers uses the Map Tip display (i.e. to show text using expressions) this will be listed inside the GetFeatureInfo output. If the layer uses a Value Map for one of his attributes, also this information will be shown in the GetFeatureInfo output.
QGIS support the following request for WMS service:
- GetCapabilities
- GetMap
- GetFeatureInfo
GetLegendGraphic (SLD-profiel)
DescribeLayer (SLD-profiel)
GetStyles (aangepast QGIS-profiel)
WFS capabilities
In the WFS capabilities area, you can select the layers that you want to publish as WFS, and specify if they will allow the update, insert and delete operations. If you enter a URL in the Advertised URL field of the WFS capabilities section, QGIS Server will advertise this specific URL in the WFS GetCapabilities response.
QGIS support the following request for WFS service:
- GetCapabilities
- DescribeFeatureType
- GetFeature
- Transaction
WCS capabilities
In the WCS capabilities area, you can select the layers that you want to publish as WCS. If you enter a URL in the Advertised URL field of the WCS capabilities section, QGIS Server will advertise this specific URL in the WCS GetCapabilities response.
Sla nu de sessie op in een projectbestand alaska.qgs. We maken een nieuwe map /usr/lib/cgi-bin/project met rechten als beheerder en voegen het projectbestand alaska.qgs en een kopie van het bestand qgis_mapserv.fcgi toe om het project te verschaffen als WMS/WFS - dat is alles.
Now we test our project WMS, WFS and WCS. Add the WMS, WFS and WCS as described in Laden van lagen WMS/WMTS, WFS- en WFS-T-cliënt and WCS-cliënt to QGIS and load the data. The URL is:
http://localhost/cgi-bin/project/qgis_mapserv.fcgi
QGIS support the following request for WCS service:
- GetCapabilities
- DescribeCoverage
- GetCoverage
Fijn afstemmen van uw OWS
For vector layers, the Fields menu of the Layer ‣ Properties dialog allows you to define for each attribute if it will be published or not. By default, all the attributes are published by your WMS and WFS. If you want a specific attribute not to be published, uncheck the corresponding checkbox in the WMS or WFS column.
You can overlay watermarks over the maps produced by your WMS by adding text annotations or SVG annotations to the project file. See section Annotation Tools in Algemeen gereedschap for instructions on creating annotations. For annotations to be displayed as watermarks on the WMS output, the Fixed map position check box in the Annotation text dialog must be unchecked. This can be accessed by double clicking the annotation while one of the annotation tools is active. For SVG annotations, you will need either to set the project to save absolute paths (in the General menu of the Project ‣ Project Properties dialog) or to manually modify the path to the SVG image in a way that it represents a valid relative path.
Extra parameters ondersteund door het verzoek WMS GetMap
In the WMS GetMap request, QGIS Server accepts a couple of extra parameters in addition to the standard parameters according to the OCG WMS 1.3.0 specification:
MAP parameter: Similar to MapServer, the MAP parameter can be used to specify the path to the QGIS project file. You can specify an absolute path or a path relative to the location of the server executable (qgis_mapserv.fcgi). If not specified, QGIS Server searches for .qgs files in the directory where the server executable is located.
Voorbeeld:
http://localhost/cgi-bin/qgis_mapserv.fcgi?\
  REQUEST=GetMap&MAP=/home/qgis/mymap.qgs&...
parameter DPI : De parameter DPI kan worden gebruikt om de resolutie voor de verzochte uitvoer te specificeren.
Voorbeeld:
http://localhost/cgi-bin/qgis_mapserv.fcgi?REQUEST=GetMap&DPI=300&...
parameter OPACITIES: Doorzichtigheid kan worden ingesteld op niveau van de laag of van een groep. Toegestane waarden reiken van 0 (volledig transparant) tot en met 255 (ondoorzichtig).
Voorbeeld:
http://localhost/cgi-bin/qgis_mapserv.fcgi?\
  REQUEST=GetMap&LAYERS=mylayer1,mylayer2&OPACITIES=125,200&...
QGIS Server logging
To log requests send to server, set the following environment variables:
QGIS_SERVER_LOG_FILE: Specificeer pad en bestandsnaam. Zorg er voor dat de server de juiste rechten heeft om naar bestanden te schrijven. Het bestand zou automatisch gemaakt moeten worden, verzend eenvoudigweg enkele verzoeken naar de server. Als het er niet is, controleer dan de rechten.
QGIS_SERVER_LOG_LEVEL: Specificeer het gewenste niveau voor het loggen. Beschikbare waarden zijn:
0 INFO (log alle verzoeken),
- 1 WARNING,
2 CRITICAL (log alleen kritische fouten, geschikt voor productiedoeleinden).
Voorbeeld:
SetEnv QGIS_SERVER_LOG_FILE /var/tmp/qgislog.txt
SetEnv QGIS_SERVER_LOG_LEVEL 0
Note
Gebruik FcgidInitialEnv in plaats van SetEnv wanneer u de module Fcgid gebruikt!
- Server logging is enabled also if executable is compiled in release mode.
Omgevingsvariabelen
QGIS_OPTIONS_PATH: The variable specifies path to directory with settings. It works the same ways as QGIS application –optionspath option. It is looking for settings file in <QGIS_OPTIONS_PATH>/QGIS/QGIS2.ini. For exaple, to set QGIS server on Apache to use /path/to/config/QGIS/QGIS2.ini settings file, add to Apache config:
SetEnv QGIS_OPTIONS_PATH "/path/to/config/"