.
QGIS Configuration
QGIS is highly configurable through the Settings menu. Choose between Panels, Toolbars, Project Properties, Options and Customization.
Notitie
QGIS follows desktop guidelines for the location of options and project properties item. Consequently related to the OS you are using, location of some of items described above could be located in the View menu (Panels and Toolbars) or in Project for Options.
Panels and Toolbars
In the Panels‣ menu, you can switch on and off QGIS widgets. The Toolbars‣ menu provides the possibility to switch on and off icon groups in the QGIS toolbar (see figure_panels_toolbars).
Figure Panels and Toolbars:
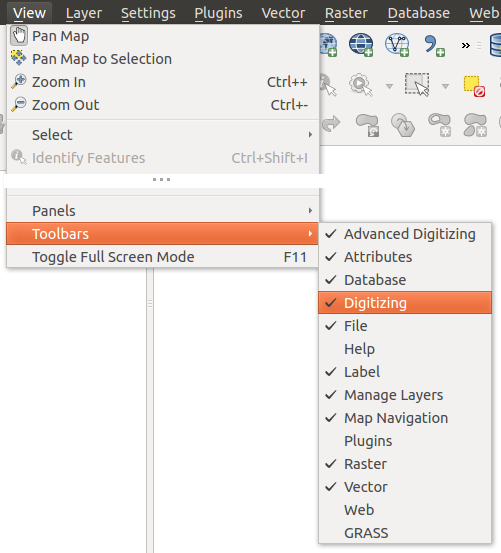
The Panels and Toolbars menu 
Tip
Activating the QGIS Overview
In QGIS, you can use an overview panel that provides a full extent view of
layers added to it. It can be selected under the menu Settings ‣ Panels or
 View ‣ Panels. Within the view is a rectangle showing the
current map extent. This allows you to quickly determine which area of the
map you are currently viewing. Note that labels are not rendered to the map
overview even if the layers in the map overview have been set up for
labeling. If you click and drag the red rectangle in the overview that shows
your current extent, the main map view will update accordingly.
View ‣ Panels. Within the view is a rectangle showing the
current map extent. This allows you to quickly determine which area of the
map you are currently viewing. Note that labels are not rendered to the map
overview even if the layers in the map overview have been set up for
labeling. If you click and drag the red rectangle in the overview that shows
your current extent, the main map view will update accordingly.
Tip
Show Log Messages
It’s possible to track the QGIS messages. You can activate
 Log Messages in the menu
Settings ‣ Panels or
View ‣ Panels and follow the messages
that appear in the different tabs during loading and operation.
Log Messages in the menu
Settings ‣ Panels or
View ‣ Panels and follow the messages
that appear in the different tabs during loading and operation.
Projectinstellingen
In the properties window for the project under
Settings ‣ Project Properties (kde) or
Project ‣ Project Properties (Gnome), you can set
project-specific options. These include:
- In the General menu, the project title, selection and background color, layer units, precision, and the option to save relative paths to layers can be defined. If the CRS transformation is on, you can choose an ellipsoid for distance calculations. You can define the canvas units (only used when CRS transformation is disabled) and the precision of decimal places to use. You can also define a project scale list, which overrides the global predefined scales.
Op de tab CRS kunt u het gewenste CRS voor dit project instellen. Daarnaast kunt u instellen dat gelijktijdige CRS transformatie moet worden gebruikt wanneer er lagen aanwezig zijn met een afwijkend CRS.
- With the third Identify layers menu, you set (or disable) which layers will respond to the identify tool (see the “Map tools” paragraph from the Opties section to enable identifying of multiple layers).
- The Default Styles menu lets you control how new layers will be drawn when they do not have an existing .qml style defined. You can also set the default transparency level for new layers and whether symbols should have random colours assigned to them. There is also an additional section where you can define specific colors for the running project. You can find the added colors in the drop down menu of the color dialog window present in each renderer.
- The tab OWS Server allows you to define information about the QGIS Server WMS and WFS capabilities, extent and CRS restrictions.
Het menu Macro’s kan worden gebruikt om functies in Python te schrijven die als module mee worden opgeslagen in het projectbestand van QGIS. Momenteel zijn er drie macro’s beschikbaar: “openProject()”, “saveProject()” en “closeProject()”.
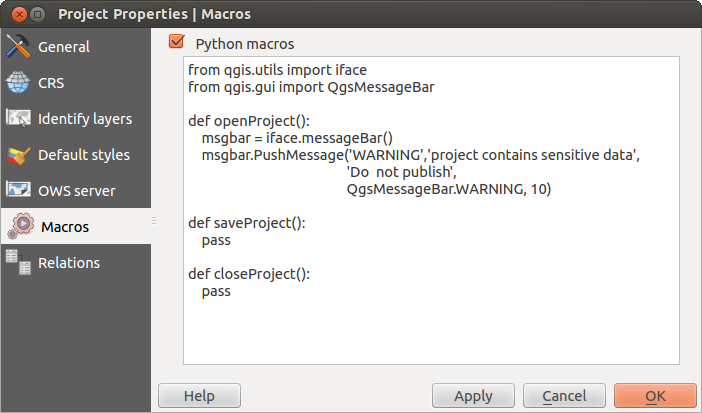
Macro settings in QGIS
Het menu Relaties wordt gebruikt om 1:n join relaties mee vast te leggen. Deze relaties worden vastgelegd in het dialoogvenster Projectinstellingen. Wanneer een eigenschap is aangemaakt voor een laag, dan zal het objectformulier een nieuw item bevatten waarmee de gerelateerde objecten zichtbaar getoond worden. Dit biedt een krachtige manier waarmee bijvoorbeeld de onderhoudshistorie van een leiding of een wegdeel kan worden vastgelegd. Lees meer over de ondersteuning van 1:n relaties in Creating one to many relations.
Opties
 Some basic options for QGIS can be selected using the
Options dialog. Select the menu option Settings ‣
Options. The tabs where you can customize your
options are described below.
Some basic options for QGIS can be selected using the
Options dialog. Select the menu option Settings ‣
Options. The tabs where you can customize your
options are described below.
Menu Algemeen
Applicatie
- Select the Style (QGIS restart required)
 and choose
between ‘Oxygen’,’Windows’,’Motif’,’CDE’, ‘Plastique’ and ‘Cleanlooks’ ().
and choose
between ‘Oxygen’,’Windows’,’Motif’,’CDE’, ‘Plastique’ and ‘Cleanlooks’ (). - Define the Icon theme . Currently only ‘default’ is
possible.
- Define the Icon size .
- Define the Font. Choose between
 Qt default and a user-defined font.
 - Change the Timeout for timed messages or dialogs .
- Verberg het openingsscherm tijdens opstarten
- Tips tonen tijdens het opstarten
- Titels groepsvak vet weergeven
- Groepsvakken in stijl van QGIS
- Eigen dialoogvensters voor kleurkeuze gebruiken
- Gebruik direct bijwerken dialoogvenster kleurkeuze
- Aangepaste stijl zijbalk
- Experimentele ondersteuning roteren kaartvenster (opnieuw starten vereist)
Projectbestanden
- Open project on launch (choose between ‘New’,
‘Most recent’ and ‘Specific’). When choosing ‘Specific’ use the
 to define a project.
 - Maak een nieuw project op basis van het standaardproject. Men heeft de mogelijkheid om het huidige project in te stellen als standaardproject met de knop [Huidige project als standaardproject opslaan] of terug te gaan naar het standaardproject met de knop [Standaard terugzetten]. Men kan een map (Sjabloonmap) instellen waar de sjablonen voor het project komen te staan met de knop [Bladeren]. Er zal een sjabloonproject gekozen kunnen worden bij de menu optie Project ‣ Nieuw van sjabloon, indien eerst het keuzevak Maak een nieuw project op basis van het standaardproject is geactiveerd en vervolgens het project in de map met sjablonen is opgeslagen.
- Geef een waarschuwing om project en gewijzigde gegevensbronnen op te slaan indien nodig
- Vraag om bevestiging wanneer een laag wordt verwijderd
- Geef een waarschuwing bij het openen van een projecbestand uit een oudere versie van QGIS
- Enable macros . This option was created to handle
macros that are written to perform an action on project events. You can
choose between ‘Never’, ‘Ask’, ‘For this session only’ and
‘Always (not recommended)’.
Systeemmenu
Systeem
De systeem-omgevingsvariabelen kunnen nu worden bekeken en deze kunnen ook worden geconfigureerd via het onderdeel systeemvariabelen (zie figuur figure_environment_variables). Dit is erg handig voor besturingssystemen zoals die op de Mac, waarbij voor een grafische applicatie de omgevingsvariabelen zoals men die kan opvragen via de terminal niet dezelfde hoeven te zijn als die door het programma worden gebruikt. Dit kan ook handig zijn om omgevingsvariabelen te zetten die gebruikt worden door externe programma’s die o.a. gebruikt worden door de Toolbox van Processing, bijv. SAGA, GRASS, en die ook gebruikt kan worden zodat bepaalde onderdelen van de broncode meer uitvoer genereren voor het opsporen van fouten (debugging).
- Gebruik aangepaste systeemvariabelen (herstart noodzakelijk - voeg scheidingstekens toe). U kunt nieuwe systeemvariabelen [Toevoegen] en met [Verwijderen] deze weer verwijderen. Bestaande omgevingsvariabelen worden getoond met Huidige systeemvariabelen –>, en het is mogelijk om alleen de specifieke systeemvariabelen voor QGIS te tonen met het keuzevak Alleen QGIS-specifieke variabelen tonen.
Figure System Environment:
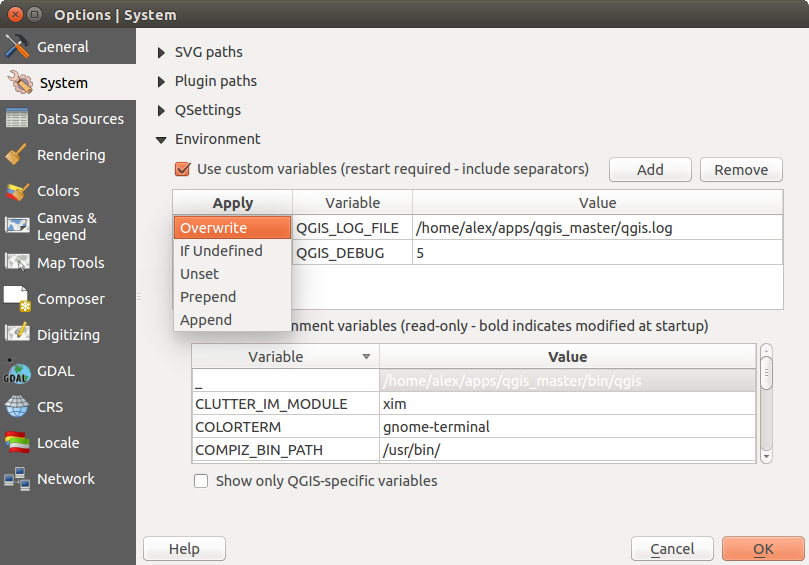
System environment variables in QGIS
Plug-in paden
[Toevoegen] of [Verwijderen] Pad(en) om naar aanvullende C++ plug-inbibliotheken te zoeken
Menu Databronnen
Object-attributen en tabel
- Open de attributentabel in een ‘dock-window’ (QGIS herstart vereist)
- Copy geometry in WKT representation from attribute
table. When using
 Copy selected rows to
clipboard from the Attribute table dialog, this has the
result that the coordinates of points or vertices are also copied to the
clipboard.
Copy selected rows to
clipboard from the Attribute table dialog, this has the
result that the coordinates of points or vertices are also copied to the
clipboard. - Attribute table behaviour . There are three
possibilities: ‘Show all features’, ‘Show selected features’ and ‘Show
features visible on map’.
- Attribute table row cache
 . This row cache makes
it possible to save the last loaded N attribute rows so that working with the
attribute table will be quicker. The cache will be deleted when closing the
attribute table.
. This row cache makes
it possible to save the last loaded N attribute rows so that working with the
attribute table will be quicker. The cache will be deleted when closing the
attribute table. Weergave van waarden NULL Hier kunt u , voor velden die een waarde NULL bevatten, een andere waarde opgeven om te laten zien.
Omgang met databron
- Scan for valid items in the browser dock . You can
choose between ‘Check extension’ and ‘Check file contents’.
- Scan for contents of compressed files (.zip) in browser dock
. ‘No’, ‘Basic scan’ and ‘Full scan’ are possible.
Suggereer raster sublagen tijdens het openen. Enkele rasterformaten ondersteunen sublagen — deze worden subdatasets in GDAL genoemd. Een voorbeeld is het netCDF bestandsformaat - wanneer er veel netCDF-variabelen zijn, dan ziet GDAL elke variabele als een subdataset. De optie wordt gebruikt om controle te krijgen hoe om te gaan, tijdens het laden van, met een rasterbestand dat sublagen bevat. De volgende keuzes zijn mogelijk:
‘Altijd’: Altijd vragen (wanneer er sublagen aanwezig zijn)
‘Indien nodig’: Vragen indien de laag geen bandlagen maar wel sublagen heeft
‘Nooit’: Nooit vragen, laad geen sublagen
‘Laad alles’: Nooit vragen, gewoon alle sublagen laden
- Ignore shapefile encoding declaration. If a shapefile
has encoding information, this will be ignored by QGIS.
- PostGIS-lagen toevoegen door dubbelklikken en selectie in uitgebreide modus
- PostGIS lagen toevoegen door dubbelklikken en selectie in uitgebreide modus
Menu Rendering
Rendering behaviour
- Standaard zullen nieuwe toegevoegde lagen aan de kaart direct worden afgebeeld
- Gebruik de cache voor het tekenen indien mogelijk om het hertekenen te versnellen
- Het gelijktijdig renderen van kaartlagen gebruik makende van meerdere CPU’s.
- Max. CPU’s om te gebruiken
Kaart-update interval (standaard 250 ms)
- Enable feature simplication by default for newly added layers
Vereenvoudigings-drempelwaarde
- Vereenvoudigen bij de bron indien mogelijk
Maximale schaal waarbij de laag vereenvoudigd zou moeten worden
Rendering kwaliteit
- Maak de lijnen minder rafelig ten koste van de tijd dat het tekenen kost
Rasters
met RGB-band selectie kan men het nummer voor de Rode, de Groene en de Blauwe band opgeven.
Contrastverhoging
- Single band gray . A single band gray can have
‘No stretch’, ‘Stretch to MinMax’, ‘Stretch and Clip to MinMax’ and also
‘Clip to MinMax’.
- Multi band color (byte/band) . Options are ‘No stretch’,
‘Stretch to MinMax’, ‘Stretch and Clip to MinMax’ and ‘Clip to MinMax’.
- Multi band color (>byte/band) . Options are ‘No stretch’,
‘Stretch to MinMax’, ‘Stretch and Clip to MinMax’ and ‘Clip to MinMax’.
- Limits (minimum/maximum) . Options are
‘Cumulative pixel count cut’, ‘Minimum/Maximum’, ‘Mean +/- standard deviation’.
Bereik Cumulatieve telling van pixels
Vermenigvuldigingsfactor voor standaardafwijking
Debuggen
- Kaartvenster update
Menu Kaartvenster en Legenda
Standaard waarden kaart (worden door projectwaarden overschreven)
Wijzig de Selectiekleur en de Achtergrondkleur.
Legenda lagen
- Double click action in legend . You can either
‘Open layer properties’ or ‘Open attribute table’ with the double click.
De volgende Legenda onderdeel stijlen zijn mogelijk:
- Laagnamen in hoofdletters
- Laagnamen vet
- Groepnamen vet
- Toon classificatie-attribuutnamen
- Rasterpictogrammen aanmaken (kan langzaam zijn)
Menu Kaartgereedschap
This menu offers some options regarding the behaviour of the Identify tool.
Zoekradius voor het identificeren en weergeven van tips op de kaart kan worden opgegeven als percentage van de kaartbreedte. Het percentage bepaalt hoe ver van een object kan worden geklikt waarbij het object nog als resultaat wordt getoond.
Accentkleur stelt u in staat op te geven in welke kleur objecten, die worden geïdentificeerd, worden getoond wanneer deze worden geaccentueerd.
- Buffer expressed as a percentage of the map width, determines a buffer distance to be rendered from the outline of the identify highlight.
- Minimum width expressed as a percentage of the map width, determines how thick should the outline of a highlighted object be.
Meetgereedschap
Geef de Rubberband kleur voor het meetgereedschap
Zet het aantal te gebruiken Decimale posities
- Keep base unit
- Preferred measurements units (‘Meters’, ‘Feet’, ‘Nautical Miles’ or ‘Degrees’)`
- Preferred angle units (‘Degrees’, ‘Radians’ or ‘Gon’)
Schuiven en zoomen
- Define Mouse wheel action (‘Zoom’, ‘Zoom and recenter’,
‘Zoom to mouse cursor’, ‘Nothing’)
Stel de Zoomfactor in voor het muiswiel
Vooraf ingestelde schalen
Here, you find a list of predefined scales. With the [+] and [-] buttons you can add or remove your individual scales.
Printvormgeving
Standaardwaarden opmaak
Hier kunt u het Standaard lettertype definiëren.
Ruitennetweergave
- Define the Grid style (‘Solid’, ‘Dots’, ‘Crosses’)
Definieer de Gridkleur
Standaarden voor raster en hulplijnen
- Define the Grid spacing
- Define the Grid offset for x and y
- Define the Snap tolerance
Menu Digitaliseren
Objectcreatie
- Geen attribuut-popup’s na het maken van elk kaartobject tonen
- Laatst ingevoerde attribuutwaarden gebruiken
- Validate geometries. Editing complex lines and polygons with many nodes can result in very slow rendering. This is because the default validation procedures in QGIS can take a lot of time. To speed up rendering, it is possible to select GEOS geometry validation (starting from GEOS 3.3) or to switch it off. GEOS geometry validation is much faster, but the disadvantage is that only the first geometry problem will be reported.
Rubberband
Wijzig de Lijndikte en Lijnkleur van de Rubberband
Snapping
- Snapping instellingen openen in een ‘dock-window’ (QGIS herstart vereist)
- Define Default snap mode (‘To vertex’, ‘To segment’,
‘To vertex and segment’, ‘Off’)
Stel de Standaard ‘snapping’-tolerantie in kaarteenheden of pixels in
Zet de Zoekradius voor aanpassingen hoekpunten in ‘kaarteenheden’ of ‘pixels’
Hoekpunten
- Markeringen alleen gebruiken voor geselecteerde objecten heeft betrekking op het tonen ervan
- Define vertex Marker style (‘Cross’ (default), ‘Semi
transparent circle’ or ‘None’)
Definieer de Grootte markering
Lijnverspring-gereedschap
The next 3 options refer to the  Offset Curve tool
in Geavanceerd digitaliseren. Through the various settings, it is possible to
influence the shape of the line offset. These options are possible starting from GEOS 3.3.
Offset Curve tool
in Geavanceerd digitaliseren. Through the various settings, it is possible to
influence the shape of the line offset. These options are possible starting from GEOS 3.3.
Verbindingsstijl
Segmenten per Kwadrant
Maximale puntlengte bij scherpe hoeken
Menu CRS
Standaard CRS voor nieuwe projecten
 Don’t enable ‘on the fly’ reprojection
- Automatically enable ‘on the fly’ reprojection if
layers have different CRS
- Enable ‘on the fly’ reprojection by default
Selecteer een CRS voor Altijd dit CRS gebruiken voor nieuwe projecten
CRS voor nieuwe kaartlagen
Dit deel geeft de mogelijkheid om aan te geven of er een actie volgt nadat een nieuwe laag is aangemaakt, of wanneer een laag zonder CRS wordt geladen.
- Prompt for CRS
- Use project CRS
- Use default CRS
Standaard datumtransformaties
- Datumtransformatie vragen indien geen standaard is gedefinieerd
Wanneer u heeft gewerkt met de gelijktijdige CRS-transformatie kunt u het resultaat in het onderliggende scherm zien. U kunt informatie vinden over ‘Bron CRS’ en ‘Doel CRS’ maar ook over ‘ Bron datumtransformatie’ en ‘Doel datumtransformatie’.
Menu Locale
- Systeemlocale negeren en Te gebruiken locale
Informatie over actieve systeemlocale
Menu Netwerk
Algemeen
Definieer een WMS zoekadres, het standaardadres is http://geopole.org/wms/search?search=\%1\&type=rss
Definieer de Time out voor netwerkaanvragen (ms) - standaard ingesteld op 60000
Definieer Standaard verlooptijd van WMSC/WMTS tegels (uur) - standaard is 24
Geef Maximaal aantal pogingen bij tile request fouten
Geef de User-Agent
Figure Network Tab:

Proxy-settings in QGIS
Cache-instellingen
Wijzig de Map en Grootte voor de cache.
- Gebruik een proxy voor internettoegang en geef de ‘Host’, ‘Poort’, ‘Gebruiker’ en ‘Wachtwoord’.
- Set the Proxy type according to your needs.
Default proxy: Proxy wordt bepaald gebaseerd op de huidige gebruikte proxy-instellingen van de toepassing
Socks5Proxy: Een algemene proxy voor elk soort verbinding. Ondersteunt TCP, UDP, directe verbinding op poort (binnenkomende connecties) en authenticatie.
HttpProxy: Gebruikt de “CONNECT” opdracht, ondersteund alleen uitgaande TCP connecties; ondersteund autenticatie.
HttpCachingProxy: Gebruikt normale HTTP opdrachten, deze is alleen geschikt bij het gebruik van HTTP requests
FtpCachingProxy: Gebruikt een FTP proxy, is alleen goed bruikbaar in de context van FTP requests.
Men kan URL’s uitsluiten door deze toe te voegen aan het tekstinvoervak onder de proxy-instellingen (zie Figure_Network_Tab).
Wanneer u meer gedetailleerde informatie nodig hebt over de verschillende instellingen voor proxy’s, verwijzen we naar de handleiding voor de QT functiebibliotheek documentatie zie http://doc.trolltech.com/4.5/qnetworkproxy.html#ProxyType-enum.
Tip
Proxy’s gebruiken
Het gebruiken van proxy’s kan soms erg lastig zijn. Gebruik de ‘trial and error’ methode om de verschillende typen proxy te testen en controleer of deze voor u werken.
You can modify the options according to your needs. Some of the changes may require a restart of QGIS before they will be effective.
- Instellingen worden opgeslagen in een tekstbestand: $HOME/.config/QGIS/QGIS2.conf
 De instellingen worden opgeslagen in: $HOME/Library/Preferences/org.qgis.qgis.plist
- Instellingen worden opgeslagen in de windows registry onder: HKEY\CURRENT_USER\Software\QGIS\qgis
Aanpassingen
The customization tool lets you (de)activate almost every element in the QGIS user interface. This can be very useful if you have a lot of plugins installed that you never use and that are filling your screen.
Figure Customization 1:

The Customization dialog
QGIS Customization is divided into five groups. In Menus,
you can hide entries in the Menu bar. In Panels, you
find the panel windows. Panel windows are applications that can be started and
used as a floating, top-level window or embedded to the QGIS main window as a
docked widget (see also Panels and Toolbars). In the
Status Bar, features like the coordinate information can be
deactivated. In Toolbars, you can (de)activate the
toolbar icons of QGIS, and in Widgets, you can (de)activate
dialogs as well as their buttons.
With  Switch to catching widgets in main application, you
can click on elements in QGIS that you want to be hidden and find the corresponding
entry in Customization (see figure_customization). You can also save your
various setups for different use cases as well. Before your changes
are applied, you need to restart QGIS.
Switch to catching widgets in main application, you
can click on elements in QGIS that you want to be hidden and find the corresponding
entry in Customization (see figure_customization). You can also save your
various setups for different use cases as well. Before your changes
are applied, you need to restart QGIS.