.
Werken met projecties
QGIS allows users to define a global and project-wide CRS (coordinate reference system) for layers without a pre-defined CRS. It also allows the user to define custom coordinate reference systems and supports on-the-fly (OTF) projection of vector and raster layers. All of these features allow the user to display layers with different CRSs and have them overlay properly.
Overzicht ondersteuning van projecties
QGIS has support for approximately 2,700 known CRSs. Definitions for each CRS are stored in a SQLite database that is installed with QGIS. Normally, you do not need to manipulate the database directly. In fact, doing so may cause projection support to fail. Custom CRSs are stored in a user database. See section Aangepast Coördinaten ReferentieSysteem for information on managing your custom coordinate reference systems.
The CRSs available in QGIS are based on those defined by the European Petroleum Search Group (EPSG) and the Institut Geographique National de France (IGNF) and are largely abstracted from the spatial reference tables used in GDAL. EPSG identifiers are present in the database and can be used to specify a CRS in QGIS.
In order to use OTF projection, either your data must contain information about its coordinate reference system or you will need to define a global, layer or project-wide CRS. For PostGIS layers, QGIS uses the spatial reference identifier that was specified when the layer was created. For data supported by OGR, QGIS relies on the presence of a recognized means of specifying the CRS. In the case of shapefiles, this means a file containing the well-known text (WKT) specification of the CRS. This projection file has the same base name as the shapefile and a .prj extension. For example, a shapefile named alaska.shp would have a corresponding projection file named alaska.prj.
Whenever you select a new CRS, the layer units will automatically be
changed in the General tab of the  Project Properties dialog under the Project (Gnome,
OS X) or Settings (KDE, Windows) menu.
Project Properties dialog under the Project (Gnome,
OS X) or Settings (KDE, Windows) menu.
Globale specificatie projectie
QGIS starts each new project using the global default projection. The global default CRS is EPSG:4326 - WGS 84 (proj=longlat +ellps=WGS84 +datum=WGS84 +no_defs), and it comes predefined in QGIS. This default can be changed via the [Select...] button in the first section, which is used to define the default coordinate reference system for new projects, as shown in figure_projection_1. This choice will be saved for use in subsequent QGIS sessions.
Figure Projection 1:
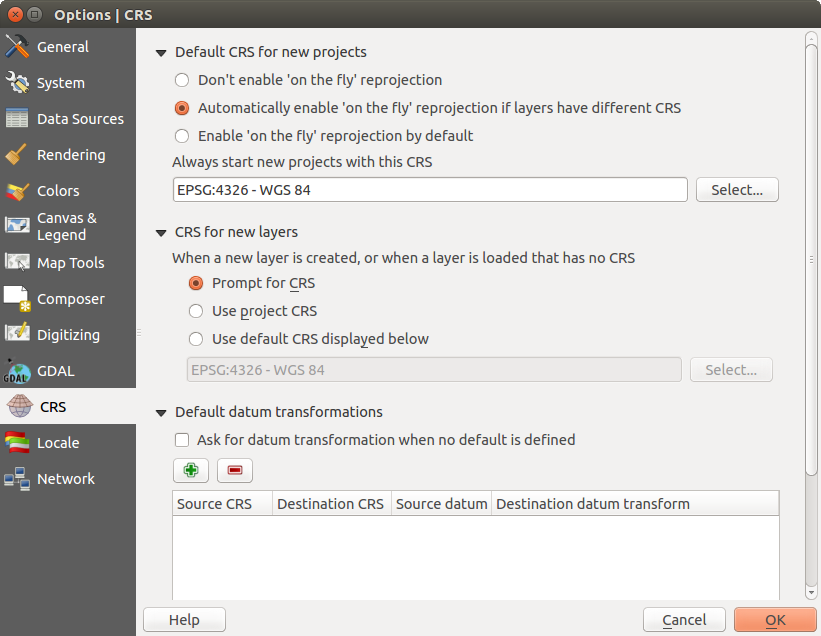
CRS tab in the QGIS Options Dialog 
When you use layers that do not have a CRS, you need to define how QGIS
responds to these layers. This can be done globally or project-wide in the
CRS tab under Settings ‣
Options.
De opties getoond in figure_projection_1 zijn:
 Prompt for CRS
 Use project CRS
- Use default CRS displayed below
If you want to define the coordinate reference system for a certain layer without CRS information, you can also do that in the General tab of the raster and vector properties dialog (see Tabblad Algemeen for rasters and Tab Algemeen for vectors). If your layer already has a CRS defined, it will be displayed as shown in Vector Layer Properties Dialog .
Tip
CRS in de kaartlegenda
Klikken met de rechter muisknop op een laag in de Kaartlegenda (zie Map Legend) geeft twee CRS snelkoppelingen. Instellen laag CRS zal direct de Ruimtelijk Referentie Systeem Keuze openen (zie figure_projection_2). Project CRS van laag overnemen zal het project-CRS instellen en gelijk maken aan de CRS van de geselecteerde laag
Gelijktijdige CRS transformatie gebruiken
QGIS supports OTF reprojection for both raster and vector data. However, OTF is
not activated by default. To use OTF projection, you must activate the
 Enable on the fly CRS transformation checkbox in the
CRS tab of the
Enable on the fly CRS transformation checkbox in the
CRS tab of the  Project
Properties dialog.
Project
Properties dialog.
Er zijn drie manieren om dit te doen:
- Select Project Properties from the
Project (Gnome, OSX) or Settings (KDE,
Windows) menu.
Klik op het pictogram
 CRS status in de linker benedenhoek van de statusbalk.
Zet Gelijktijdige CRS transformatie standaard aan, door op de tab CRS van het dialoogvenster Opties of het keuzevak
Gelijktijdige CRS transformatie gebruiken te selecteren of Gelijktijdige CRS transformatie inschakelen indien kaartlagen verschillende CRS hebben.
Wanneer u al een laag hebt geladen, en u wilt Gelijktijdige CRS transformatie gebruiken, dan kunt u het beste de tab CRS van het dialoogvenster Projecteigenschappen openen, een CRS selecteren en daarna de optie Gelijktijdige CRS transformatie gebruiken selecteren. Het pictogram CRS status zal niet langer uit gegrijsd zijn en alle lagen zullen geprojecteerd worden naar de CRS die getoond wordt naast het pictogram.
Figure Projection 2:
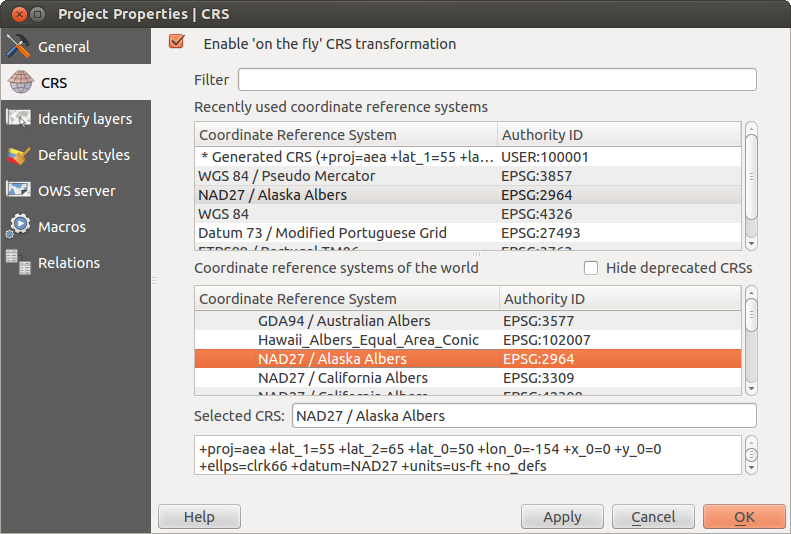
Project Properties Dialog
De tab CRS van het dialoogvenster Projecteigenschappen bevat vijf belangrijke onderdelen zoals getoond in Figure_projection_2 en die hieronder worden beschreven:
Gelijktijdige CRS-Transformatie gebruiken - dit keuzevak wordt gebruikt om de gelijktijdige CRS transformatie te (de)activeren. Indien niet geselecteerd zal elke laag getekend worden met behulp van de coördinaten zoals gelezen vanuit de gegevensbron en de onderstaande beschreven componenten zijn daarbij uitgeschakeld. Indien wel geselecteerd zullen de coördinaten van elke laag worden geprojecteerd naar het coördinaten referentie systeem zoals ingesteld voor het kaartvenster.
Filter — wanneer de EPSGcode bekend is, of de identificatie of de naam van een Coördinaten ReferentieSysteem, kunt u gebruik maken van een zoekterm om deze te vinden. Geef de EPSGcode, de identificatie of de naam op als zoekterm.
Recent gebruikte coördinaten referentie systemen — wanneer u bepaalde CRS-en vaker gebruikt, dan zullen deze getoond worden onder in de tabel van het dialoogvenster Projectie. Klik op één van deze items om het daarbij behorende CRS te selecteren.
- Coordinate reference systems of the world — This is a list of all CRSs supported by QGIS, including Geographic, Projected and Custom coordinate reference systems. To define a CRS, select it from the list by expanding the appropriate node and selecting the CRS. The active CRS is preselected.
Proj4 text — Dit is de CRS-tekst die gebruikt wordt door de PROJ.4 projectie engine. Deze tekst is alleen-lezen en wordt ter informatie gegeven.
Tip
Dialoogvenster Projecteigenschappen
Wanneer u het dialoogvenster Projecteigenschappen opent via het menu Project, dan moet u vervolgens de tab CRS selecteren om de instellingen voor het CRS te bekijken.
Het openen van het dialoogvenster via het pictogram CRS status zal direct de tab CRS openen.
Aangepast Coördinaten ReferentieSysteem
If QGIS does not provide the coordinate reference system you need, you can
define a custom CRS. To define a CRS, select  Custom CRS... from the Settings menu. Custom CRSs
are stored in your QGIS user database. In addition to your custom CRSs, this
database also contains your spatial bookmarks and other custom data.
Custom CRS... from the Settings menu. Custom CRSs
are stored in your QGIS user database. In addition to your custom CRSs, this
database also contains your spatial bookmarks and other custom data.
Figure Projection 3:
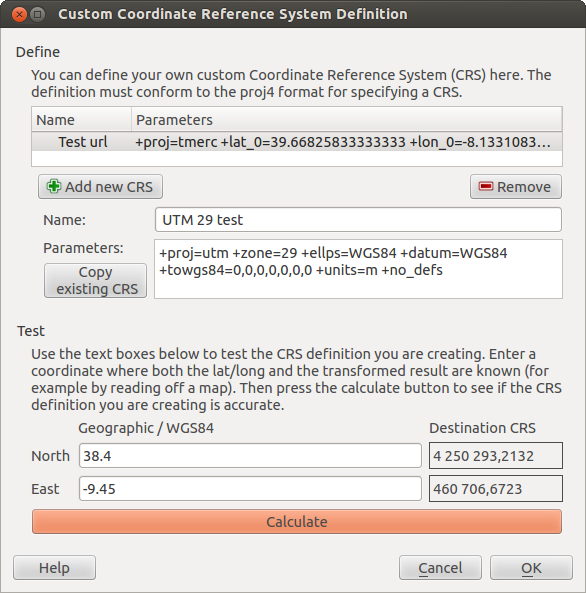
Custom CRS Dialog
Defining a custom CRS in QGIS requires a good understanding of the PROJ.4 projection library. To begin, refer to “Cartographic Projection Procedures for the UNIX Environment - A User’s Manual” by Gerald I. Evenden, U.S. Geological Survey Open-File Report 90-284, 1990 (available at ftp://ftp.remotesensing.org/proj/OF90-284.pdf).
This manual describes the use of the proj.4 and related command line utilities. The cartographic parameters used with proj.4 are described in the user manual and are the same as those used by QGIS.
Het dialoogvenster Definitie aangepast Coördinaten Referentie Systeem heeft slechts twee parameters nodig om een gebruikers CRS te maken:
Een beschrijvende naam
De cartografische parameters in indeling voor PROJ.4
To create a new CRS, click the  Add new CRS button and enter a
descriptive name and the CRS parameters.
Add new CRS button and enter a
descriptive name and the CRS parameters.
Let daarbij op dat Parameters moet beginnen met +proj= om een nieuw Coördinaten ReferentieSysteem te maken.
U kunt de opgegeven parameters voor het CRS testen om te zien of deze goede resultaten geven. geef, om dit te doen, bekende coördinaten in waarden lat/long voor WGS84 op in de velden Noord en Oost. Klik op [Bereken] en vergelijk de resultaten met de bekende waarden in uw Coördinaten ReferentieSysteem.
Standaard datumtransformaties
OTF depends on being able to transform data into a ‘default CRS’, and QGIS uses WGS84. For some CRS there are a number of transforms available. QGIS allows you to define the transformation used otherwise QGIS uses a default transformation.
In the CRS tab under Settings ‣
Options you can:
- set QGIS to ask you when it needs define a transformation using Ask for datum transformation when no default is defined
een lijst van standaarden voor transformaties van gebruikers bewerken.
QGIS asks which transformation to use by opening a dialogue box
displaying PROJ.4 text describing the source and destination
transforms. Further information may be found by hovering over a
transform. User defaults can be saved by selecting
Remember selection.