Table Des Matières
- User guide/Manual
- Préambule
- Conventions
- Avant-propos
- Fonctionnalités
- What’s new in QGIS 2.8
- Premiers Pas
- QGIS GUI
- Outils généraux
- QGIS Configuration
- Utiliser les projections
- QGIS Browser
- Les données vectorielles
- Les données raster
- Les données OGC
- Les données GPS
- Intégration du SIG GRASS
- QGIS processing framework
- Fournisseurs d’algorithmes
- Composeur d’Impression
- Extensions
- Aide et support
- Annexe
- Bibliographie
- User guide/Manual PDF’s
- PyQGIS cookbook
- Documentation Guidelines
- A gentle introduction in GIS
- Trainings manual
.
Fenêtre Propriétés de la couche raster
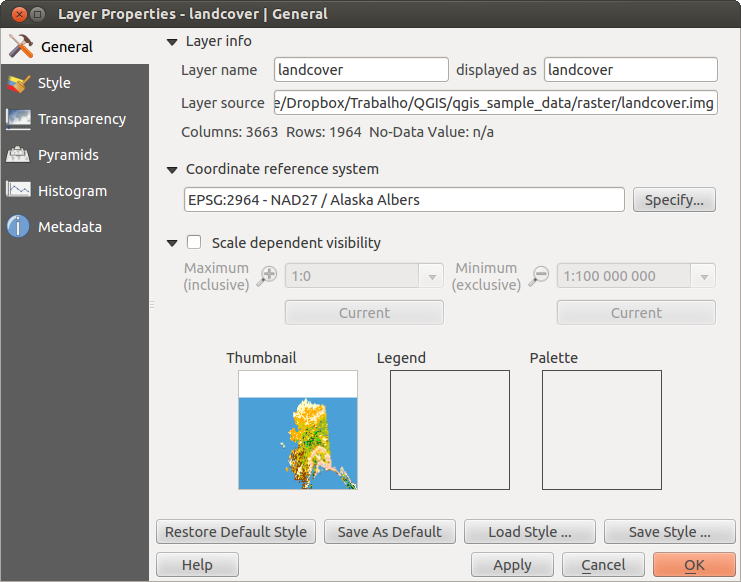
Pour voir et définir les propriétés d’une couche raster, double-cliquez sur le nom de la couche dans la légende de la carte ou faites un clic-droit son nom et choisissez Propriétés dans le menu qui apparaît. La fenêtre des Propriétés de la couche apparaîtra (voir figure_raster_1).
Il y a plusieurs onglets dans cette fenêtre :
Général
- Style
Transparence
Pyramides
Histogramme
Métadonnées
Figure Raster 1:
Onglet Général
Informations sur la couche
L’onglet Général affiche des informations basiques sur le raster sélectionné, dont la source de la couche, le nom affiché dans la légende (qui peut être modifié), le nombre de colonnes, lignes et les valeurs ‘no-data’.
Système de coordonnées de référence
Le système de coordonnées de référence (SCR) est également affiché ici au format PROJ.4. S’il est incorrect, il peut être modifié en cliquant sur le bouton [Spécifier].
Visibilité dépendante de l’échelle
La visibilité en fonction de l’échelle se définit également dans cet onglet. Vous devez activer la case à cocher et définir une échelle appropriée pour l’affichage de vos données sur la carte.
Tout en bas, sont affichés un aperçu de la couche, son symbole de légende et sa palette.
Onglet Style
Rendu des bandes raster
QGIS offers four different Render types. The renderer chosen is dependent on the data type.
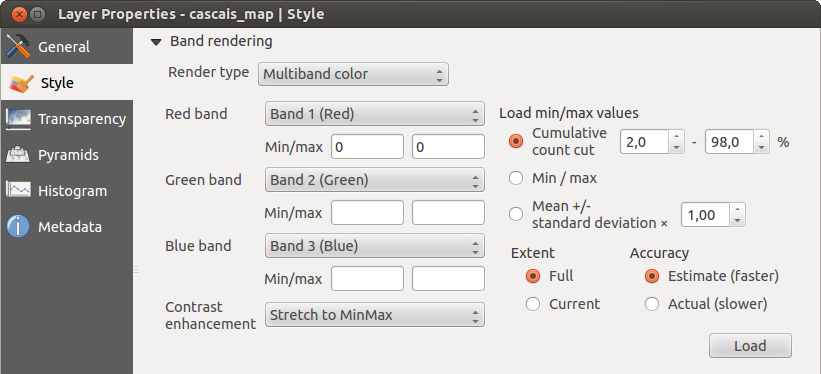
Couleur à Bandes Multiples - Si le fichier raster est multibande et contient plusieurs bandes (par exemple, avec une image satellite)
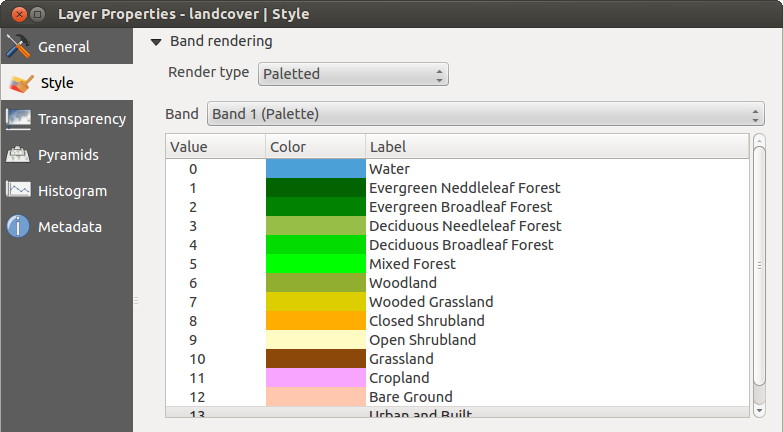
Palette - Si le fichier ne contient qu’une seule bande indexée (par exemple, pour les cartes topographiques)
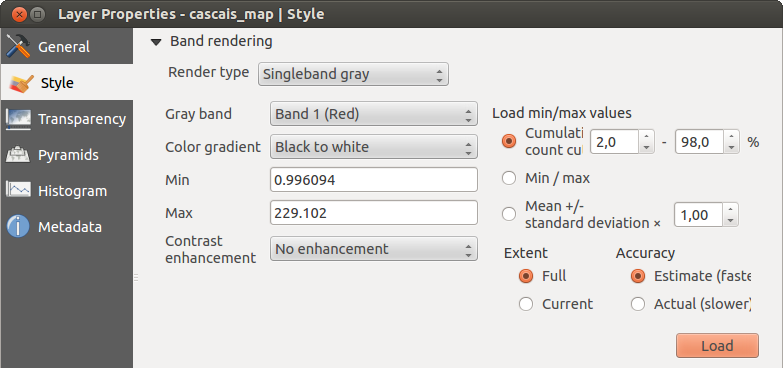
- Singleband gray - (one band of) the image will be rendered as gray; QGIS will choose this renderer if the file has neither multibands nor an indexed palette nor a continous palette (e.g., used with a shaded relief map)
Pseudo-Couleur à Banque Unique - vous pouvez utiliser ce rendu pour les fichiers contenant une palette continue ou des cartes en couleur (par exemple pour une carte des altitudes)
Couleur à bandes multiples
Avec ce type de rendu, trois bandes de l’image seront utilisées, chacune correspondant à la composante rouge, verte ou bleue de l’image colorée finale. Vous pouvez choisir parmi différentes méthodes d’Amélioration du contraste : ‘Pas d’amélioration’, ‘Étirer jusqu’au MinMax’, ‘Étirer et couper jusqu’au MinMax’ ou ‘Couper jusqu’au MinMax’.
Figure Raster 2:
This selection offers you a wide range of options to modify the appearance
of your raster layer. First of all, you have to get the data range from your
image. This can be done by choosing the Extent and pressing
[Load]. QGIS can  Estimate (faster) the
Min and Max values of the bands or use the
 Actual (slower) Accuracy.
Now you can scale the colors with the help of the Load min/max values section.
A lot of images have a few very low and high data. These outliers can be eliminated
using the  Cumulative count cut setting. The standard data range is set
from 2% to 98% of the data values and can be adapted manually. With this
setting, the gray character of the image can disappear.
With the scaling option
  Min/max, QGIS creates a color table with all of
the data included in the original image (e.g., QGIS creates a color table
with 256 values, given the fact that you have 8 bit bands).
You can also calculate your color table using the
  Mean +/- standard deviation x
  .
Then, only the values within the standard deviation or within multiple standard deviations
are considered for the color table. This is useful when you have one or two cells
with abnormally high values in a raster grid that are having a negative impact on
the rendering of the raster.
All calculations can also be made for the  Current extent.
Astuce
Visualiser une seule bande d’un raster multibande
Si vous désirez visualiser une seule bande d’une image multibande (par exemple la bande rouge), vous pouvez penser que vous pourriez définir les bandes Verte et Bleue à “Non définie”. Mais ce n’est pas la manière correcte. Pour afficher la bande Rouge, définissez le type d’image à Bande grise unique, puis sélectionnez la bande Rouge comme bande à utiliser pour le gris.
Palette
This is the standard render option for singleband files that already include a color table, where each pixel value is assigned to a certain color. In that case, the palette is rendered automatically. If you want to change colors assigned to certain values, just double-click on the color and the Select color dialog appears. Also, in QGIS 2.2. it’s now possible to assign a label to the color values. The label appears in the legend of the raster layer then.
Figure Raster 3:
Amélioration de contraste
Note
When adding GRASS rasters, the option Contrast enhancement will always be set automatically to stretch to min max, regardless of if this is set to another value in the QGIS general options.
Bande grise unique
This renderer allows you to render a single band layer with a Color gradient:
‘Black to white’ or ‘White to black’. You can define a Min
and a Max value by choosing the Extent first and
then pressing [Load]. QGIS can  Estimate (faster) the
Min and Max values of the bands or use the
 Actual (slower) Accuracy.
Figure Raster 4:
With the Load min/max values section, scaling of the color table
is possible. Outliers can be eliminated using the  Cumulative count cut setting.
The standard data range is set from 2% to 98% of the data values and can
be adapted manually. With this setting, the gray character of the image can disappear.
Further settings can be made with
  Min/max and
 Mean +/- standard deviation x
  .
While the first one creates a color table with all of the data included in the
original image, the second creates a color table that only considers values
within the standard deviation or within multiple standard deviations.
This is useful when you have one or two cells with abnormally high values in
a raster grid that are having a negative impact on the rendering of the raster.
Pseudo-couleur à bande unique
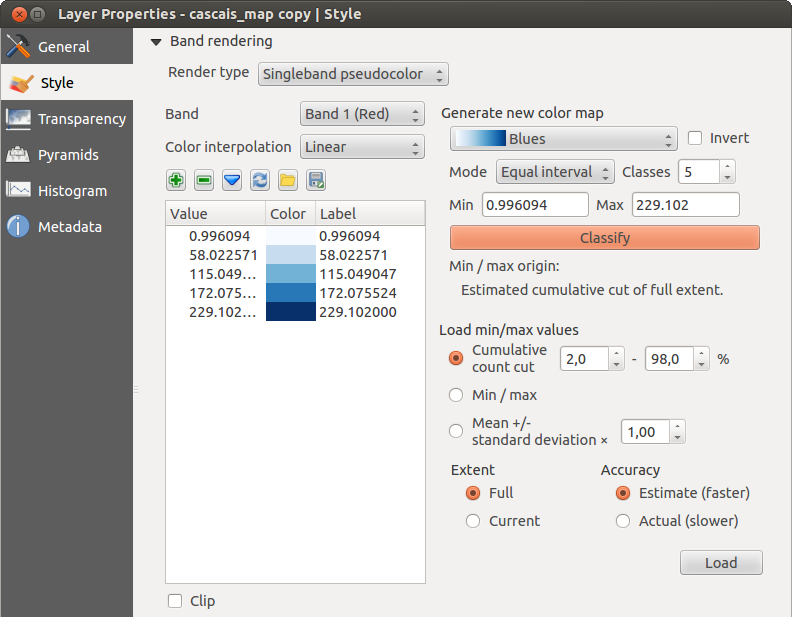
This is a render option for single-band files, including a continous palette. You can also create individual color maps for the single bands here.
Figure Raster 5:
Trois manières de faire une interpolation de couleurs sont disponibles :
Discrète
Linéaire
Exacte
In the left block, the button  Add values manually adds a value to the
individual color table. The button
  Remove selected row
deletes a value from the individual color table, and the
 Sort colormap items button sorts the color table according
to the pixel values in the value column. Double clicking on the value column lets
you insert a specific value. Double clicking on the color column opens the dialog
Change color, where you can select a color to apply on that value. Further,
you can also add labels for each color, but this value won’t be displayed when you use the identify
feature tool.
You can also click on the button
  Load color map from band,
which tries to load the table from the band (if it has any). And you can use the
buttons
  Load color map from file or
  Export color map to file to load an existing color table or to save the
defined color table for other sessions.
In the right block, Generate new color map allows you to create newly
categorized color maps. For the Classification mode  ‘Equal interval’,
you only need to select the number of classes
 and press the button Classify. You can invert the colors
of the color map by clicking the
  Invert
checkbox. In the case of the Mode
  ‘Continous’, QGIS creates
classes automatically depending on the Min and Max.
Defining Min/Max values can be done with the help of the Load min/max values section.
A lot of images have a few very low and high data. These outliers can be eliminated
using the
  Cumulative count cut setting. The standard data range is set
from 2% to 98% of the data values and can be adapted manually. With this
setting, the gray character of the image can disappear.
With the scaling option
  Min/max, QGIS creates a color table with all of
the data included in the original image (e.g., QGIS creates a color table
with 256 values, given the fact that you have 8 bit bands).
You can also calculate your color table using the
  Mean +/- standard deviation x
  .
Then, only the values within the standard deviation or within multiple standard deviations
are considered for the color table.
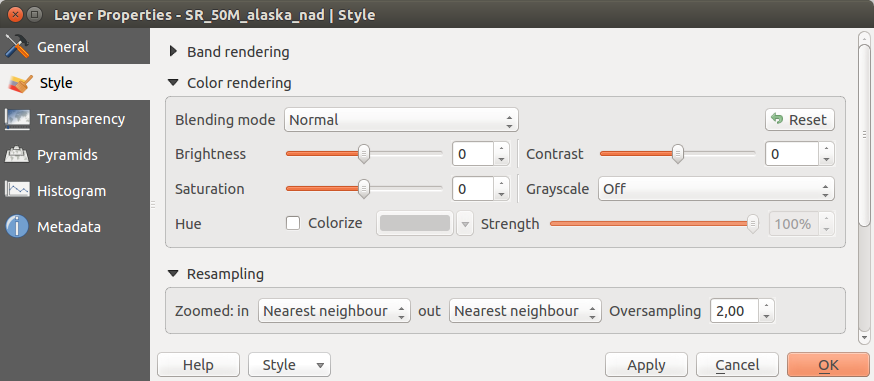
Rendu des couleurs
Pour chaque type de Rendu par bande, des options de Rendu de la couleur sont disponibles.
Vous pouvez réaliser des effets spéciaux sur le rendu de vos rasters en utilisant un des modes de fusion (voir Fenêtre Propriétés d’une couche vecteur).
Further settings can be made in modifiying the Brightness, the Saturation and the Contrast. You can also use a Grayscale option, where you can choose between ‘By lightness’, ‘By luminosity’ and ‘By average’. For one hue in the color table, you can modify the ‘Strength’.
Ré-échantillonnage
Les options de Ré-échantillonnage déterminent l’apparence d’un raster quand vous zoomez ou dé-zoomez. Différents modes de ré-échantillonnage permettent d’optimiser l’apparence d’un raster. Ils calculent une nouvelle matrice de valeurs via une transformation géométrique.
Figure Raster 6:
En appliquant la méthode ‘Plus proche voisin’, le raster peut apparaître pixelisé lorsque l’on zoome dessus. Ce rendu peut être amélioré en choisissant les méthodes ‘Bilinéaire’ ou ‘Cubique’ qui adoucissent les angles. L’image est alors lissée. Ces méthodes sont adaptées par exemple aux rasters d’élévation.
Onglet Transparence
QGIS has the ability to display each raster layer at a different transparency level.
Use the transparency slider  to indicate to what extent the underlying layers
(if any) should be visible though the current raster layer. This is very useful
if you like to overlay more than one raster layer (e.g., a shaded relief map
overlayed by a classified raster map). This will make the look of the map more
three dimensional.
De plus, vous pouvez entrer une valeur raster qui sera traitée comme NODATA dans Valeur nulle supplémentaire.
Un moyen encore plus flexible de personnaliser la transparence est d’utiliser la section Options de transparence personnalisée. La transparence de chaque pixel peut être définie dans cet onglet.
As an example, we want to set the water of our example raster file landcover.tif to a transparency of 20%. The following steps are neccessary:
Chargez le raster landcover.tif.
Ouvrez la boîte de dialogue Propriétés de la couche en double-cliquant sur le nom du raster dans la légende ou avec un clic droit et en choisissant Propriétés dans le menu qui apparaît.
Sélectionnez l’onglet Transparence.
Dans la liste Bande de transparence, choisissez ‘Aucune’.
- Click the
 Add values manually
button. A new row will appear in the pixel list.
 Entrez la valeur raster dans les colonnes ‘De’ et ‘Vers’ (mettez la valeur 0) puis ajustez la transparence à 20%.
Cliquez sur le bouton [Appliquer] et regardez la carte.
Vous pouvez répéter les étapes 5 et 6 pour personnaliser la transparence d’autres valeurs.
As you can see, it is quite easy to set custom transparency, but it can be
quite a lot of work. Therefore, you can use the button  Export to file to save your transparency list to a file. The button
 Import from file loads your transparency settings and
applies them to the current raster layer.
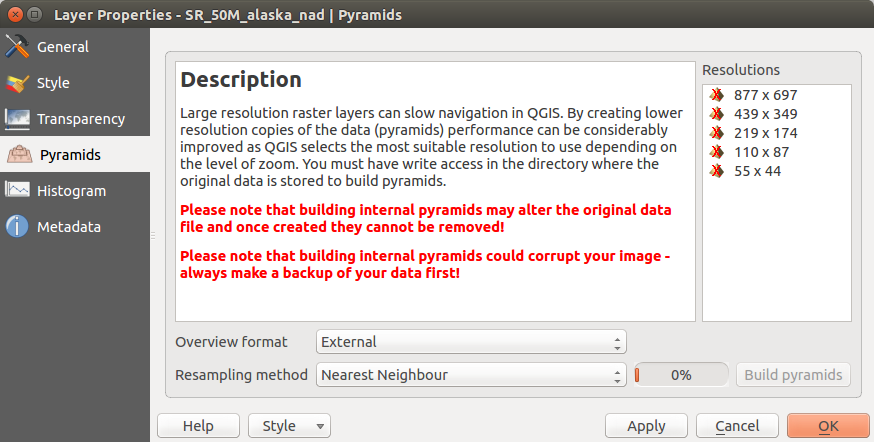
Onglet Pyramides
Large resolution raster layers can slow navigation in QGIS. By creating lower resolution copies of the data (pyramids), performance can be considerably improved, as QGIS selects the most suitable resolution to use depending on the level of zoom.
Vous devez avoir accès en écriture dans le répertoire où les données originelles sont stockées pour construire les pyramides.
Plusieurs méthodes de ré-échantillonnage peuvent être utilisées pour calculer les pyramides :
Plus proche voisin
Moyenne
- Gauss
Cubique
- Mode
Aucune
If you choose ‘Internal (if possible)’ from the Overview format menu, QGIS tries to build pyramids internally. You can also choose ‘External’ and ‘External (Erdas Imagine)’.
Figure Raster 7:
Notez que construire des pyramides peut altérer le fichier original et, une fois créées, elles ne peuvent plus être supprimées. Si vous désirez préserver une version ‘sans pyramide’ de vos raster, réalisez une copie de sauvegarde avant de les construire.
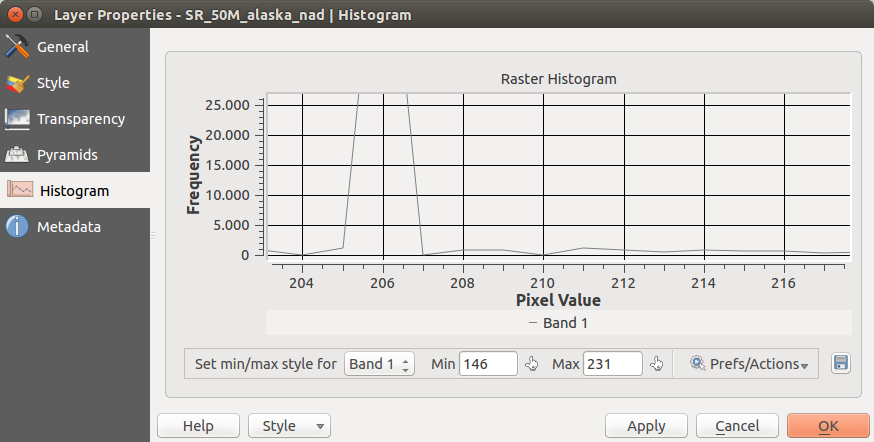
Onglet Histogramme
The Histogram menu allows you to view the distribution of the bands
or colors in your raster. The histogram is generated automatically when you open the
Histogram menu. All existing bands will be displayed together. You can
save the histogram as an image with the  button.
With the Visibility option in the
  Prefs/Actions menu,
you can display histograms of the individual bands. You will need to select the option
 Show selected band.
The Min/max options allow you to ‘Always show min/max markers’, to ‘Zoom
to min/max’ and to ‘Update style to min/max’.
With the Actions option, you can ‘Reset’ and ‘Recompute histogram’ after
you have chosen the Min/max options.
Figure Raster 8:
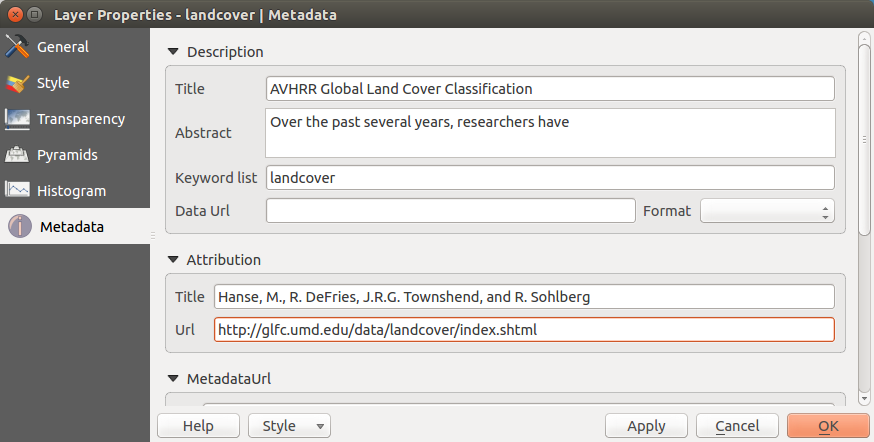
Onglet Métadonnées
L’onglet Métadonnées affiche de nombreuses informations sur la couche raster, dont les statistiques sur chaque bande de la couche raster. Les informations sont regroupées par section : Description, Attribution, URL Métadonnées et Propriétés. Les statistiques sont recueillies ‘à la demande’, de sorte qu’il est possible que les statistiques sur une couche n’aient pas encore été collectées.
Figure Raster 9:
