.
Live GPS トラッキング
QGIS でライブGPSトラッキングを有効にするためには 設定 ‣ パネル または ビュー ‣ パネル の  GPS 情報 を選択して下さい. キャンバスの左側に新しいウィンドウが表示されるはずです.
GPSトラッキングウィンドウでは4つの表示可能なスクリーンがあります:
 GPS位置座標と手動で頂点と地物を入力します。
 衛星との接続のGPSシグナル長。
 衛星の数と極性位置を示すGPS極性画面。
 GPS オプションスクリーン ( figure_gps_options 参照).
繋がれている GPS レシーバ (あなたのオペレーティングシステムでサポートされているもの) を利用する場合は単純に [接続] をクリックするとその GPS は QGIS に接続されます. 次にクリックすると ( [切断] になっています) GPS-レシーバをコンピュータから切断します. GNU/Linuxの gpsd サポートはほとんどのGPSレシーバの接続を統合しています. ですから QGIS にGPSレシーバを接続したい場合最初に gpsdプロパティを設定するべきです.
警告
あなたがキャンバスに自分の位置を記録したい場合は,最初に新しいベクタレイヤを作成し,あなたのトラックを記録することができるようにステータスを編集可能に切り替えなければいけません.
位置と追加属性
GPSが衛星から信号を受信している時にあなたの位置を経度, 緯度,高度や追加属性と一緒に見ることができます.
Figure GPS Position:
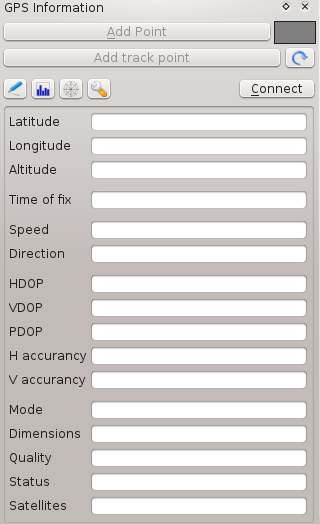
GPSトラッキング位置と追加属性 
GPS 極座標 ウィンドウ
接続しているすべての衛星が空のどの方向にあるのか知りたい場合は極座標スクリーンに切り替えて下さい.そこでは受信した信号から得られた衛星のID番号も閲覧できます.
Figure GPS polar window:

GPSトラッキング 極性ウィンドウ
GPS オプション
接続に問題がある場合以下のオプションの切り替えができます:
 自動検出
自動検出 内部
内部- シリアルデバイス
- gpsd (あなたのGPSが接続されているホスト,ポートとデバイスを選択して下さい)
[接続] を再度クリックするとGPSレシーバとの接続を初期化します.
Figure GPS Tracking 2:
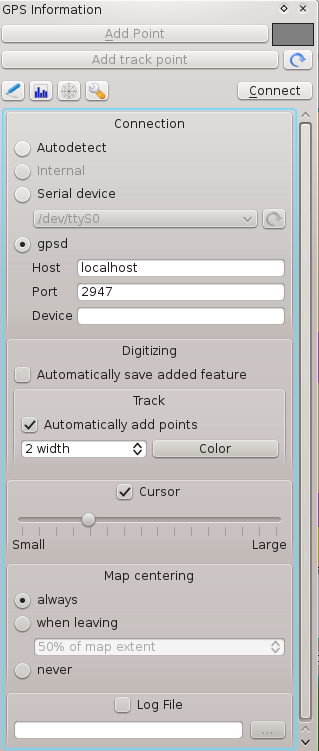
GPSトラッキングオプションウィンドウ
編集モードになっている場合 追加された地物を自動的に保存する オプションを有効にすることができます. また 自動的に点を追加する オプションを有効にして地図キャンパスに指定した幅と色で点を追加できます.
Activating Cursor, you can use a slider  to shrink
and grow the position cursor on the canvas.
to shrink
and grow the position cursor on the canvas.
Activating Map centering allows you to decide in which
way the canvas will be updated. This includes ‘always’, ‘when leaving’, if your
recorded coordinates start to move out of the canvas, or ‘never’, to keep map
extent.
最後に ログファイル を有効にしてGPSトラッキングで記録されたログメッセージを書き込むファイルのパスを指定することができます.
もし地物を手動で追加したい場合は 位置 に移動して [ポイントの追加] か [トラックポイントの追加] をクリックして下さい.
ライブトラッキングのBluetooth GPS への接続
With QGIS you can connect a Bluetooth GPS for field data collection. To perform this task you need a GPS Bluetooth device and a Bluetooth receiver on your computer.
At first you must let your GPS device be recognized and paired to the computer. Turn on the GPS, go to the Bluetooth icon on your notification area and search for a New Device.
On the right side of the Device selection mask make sure that all devices are selected so your GPS unit will probably appear among those available. In the next step a serial connection service should be available, select it and click on [Configure] button.
Remember the number of the COM port assigned to the GPS connection as resulting by the Bluetooth properties.
After the GPS has been recognized, make the pairing for the connection. Usually the autorization code is 0000.
Now open :guilabel:`GPS information`panel and switch to GPS
options screen. Select the COM port assigned to the GPS connection and click
the [Connect]. After a while a cursor indicating your position should
appear.
If QGIS can’t receive GPS data, then you should restart your GPS device, wait 5-10 seconds then try to connect again. Usually this solution work. If you receive again a connection error make sure you don’t have another Bluetooth receiver near you, paired with the same GPS unit.
GPSMAP 60cs の利用
MS Windows
Easiest way to make it work is to use a middleware (freeware, not open) called GPSGate.
Launch the program, make it scan for GPS devices (works for both USB and BT
ones) and then in QGIS just click [Connect] in the Live tracking panel
using the Autodetect mode.
Ubuntu/Mint GNU/Linux
As for Windows the easiest way is to use a server in the middle, in this case GPSD, so
sudo apt-get install gpsd
``garmin_gps``カーネルモジュールを読み込みます
sudo modprobe garmin_gps
And then connect the unit. Then check with dmesg the actual device being used bu the unit, for example /dev/ttyUSB0. Now you can launch gpsd
gpsd /dev/ttyUSB0
And finally connect with the QGIS live tracking tool.
BTGP-38KM datalogger (Bluetoothのみ)の利用
Using GPSD (under Linux) or GPSGate (under Windows) is effortless.
Using BlueMax GPS-4044 datalogger (both BT and USB)
MS Windows
The live tracking works for both USB and BT modes, by using GPSGate or even
without it, just use the Autodetect mode, or point
the tool the right port.
Ubuntu/Mint GNU/Linux
USB
The live tracking works both with GPSD
gpsd /dev/ttyACM3
or without it, by connecting the QGIS live tracking tool directly to the device (for example /dev/ttyACM3).
Bluetooth
The live tracking works both with GPSD
gpsd /dev/rfcomm0
or without it, by connecting the QGIS live tracking tool directly to the device (for example /dev/rfcomm0).