.
座標取得プラグイン
座標入力プラグインは使いやすく、選択した2つの座標参照系(CRS)について地図上のキャンバスに座標を表示する機能を提供します。
Figure Coordinate Capture 1:
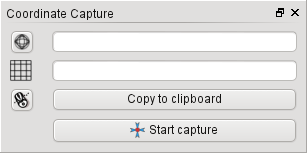
座標取得プラグイン 
QGIS を起動した後で 設定 (KDE, Windows) または ファイル (Gnome, OSX)メニューの
 Project Properties を選択して Projection タブをクリックして下さい. 別の方法としてはステータスバーの右側にある
  CRS status アイコンをクリックしてもいいです.
 オンザフライCRS変換を有効にする`チェックボックスをクリックし、プロジェクトの座標系を選択します (:ref:`label_projections も参照すること)。
- Load the coordinate capture plugin in the Plugin Manager (see
load_core_plugin) and ensure that the dialog is visible by going to
View ‣ Panels and ensuring that
Coordinate Capture is enabled. The coordinate capture dialog
appears as shown in Figure figure_coordinate_capture_1. Alternatively,
you can also go to Vector ‣ Coordinate Capture and see
if Coordinate Capture is enabled.
- Click on the
 Click to the select the CRS to use for
coordinate display icon and select a different CRS from the one you selected
above.
Click to the select the CRS to use for
coordinate display icon and select a different CRS from the one you selected
above. 座標入力を開始するには**[入力開始]**をクリックします。それからマップキャンバス上の任意の場所をクリックすると、プラグインは、あなたの選択したCRSの両方の座標を表示します。
マウスの座標追跡を可能にするには、
 マウストラッキング アイコンをクリックして下さい.
選択した座標をクリップボードにコピーすることができます。