.
サポートされるデータ形式
QGIS uses the OGR library to read and write vector data formats, including ESRI shapefiles, MapInfo and MicroStation file formats, AutoCAD DXF, PostGIS, SpatiaLite, Oracle Spatial and MSSQL Spatial databases, and many more. GRASS vector and PostgreSQL support is supplied by native QGIS data provider plugins. Vector data can also be loaded in read mode from zip and gzip archives into QGIS. As of the date of this document, 69 vector formats are supported by the OGR library (see OGR-SOFTWARE-SUITE in 文献とWeb参照). The complete list is available at http://www.gdal.org/ogr/ogr_formats.html.
ノート
Not all of the listed formats may work in QGIS for various reasons. For example, some require external commercial libraries, or the GDAL/OGR installation of your OS may not have been built to support the format you want to use. Only those formats that have been well tested will appear in the list of file types when loading a vector into QGIS. Other untested formats can be loaded by selecting *.*.
GRASS ベクタデータの利用方法はセクション GRASS GIS の統合 に記述されています.
This section describes how to work with several common formats: ESRI shapefiles, PostGIS layers, SpatiaLite layers, OpenStreetMap vectors, and Comma Separated data (CSV). Many of the features available in QGIS work the same, regardless of the vector data source. This is by design, and it includes the identify, select, labeling and attributes functions.
ESRI Shapefiles
The standard vector file format used in QGIS is the ESRI shapefile. Support is provided by the OGR Simple Feature Library (http://www.gdal.org/ogr/).
ひとつのshapefileは実際多くのファイルで構成されています.以下の3個が必須のものです:
.shp ファイルは地物のジオメトリを持ちます.
.dbf ファイルはdBase形式で属性を保持します.
.shx はインデックスファイルです.
Shapefilesではさらに .prj という拡張子のファイルが含まれることがあります, このファイルには投影法の情報が保持されています. プロジェクションファイルがあると便利ですが,このファイルは必須のファイルではありません. shapefile データセットは追加のファイルを持つことができます. さらに詳細な情報は ESRI technical specification at: http://www.esri.com/library/whitepapers/pdfs/shapefile.pdf を参照して下さい.
Loading a Shapefile
To load a shapefile, start QGIS and click on the  Add Vector Layer toolbar button, or simply press Ctrl+Shift+V.
This will bring up a new window (see figure_vector_1).
Add Vector Layer toolbar button, or simply press Ctrl+Shift+V.
This will bring up a new window (see figure_vector_1).
Figure Vector 1:
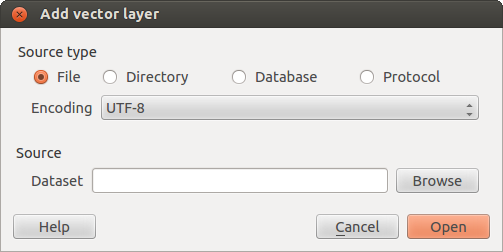
Add Vector Layer Dialog 
From the available options check  File. Click on
[Browse]. That will bring up a standard open file dialog
(see figure_vector_2), which allows you to navigate the file system and load a
shapefile or other supported data source. The selection box Filter
File. Click on
[Browse]. That will bring up a standard open file dialog
(see figure_vector_2), which allows you to navigate the file system and load a
shapefile or other supported data source. The selection box Filter
 allows you to preselect some OGR-supported file formats.
You can also select the encoding for the shapefile if desired.
Figure Vector 2:
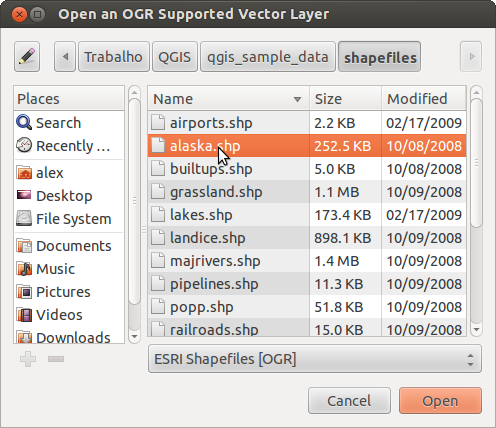
Open an OGR Supported Vector Layer Dialog
Selecting a shapefile from the list and clicking [Open] loads it into QGIS. Figure_vector_3 shows QGIS after loading the alaska.shp file.
Figure Vector 3:
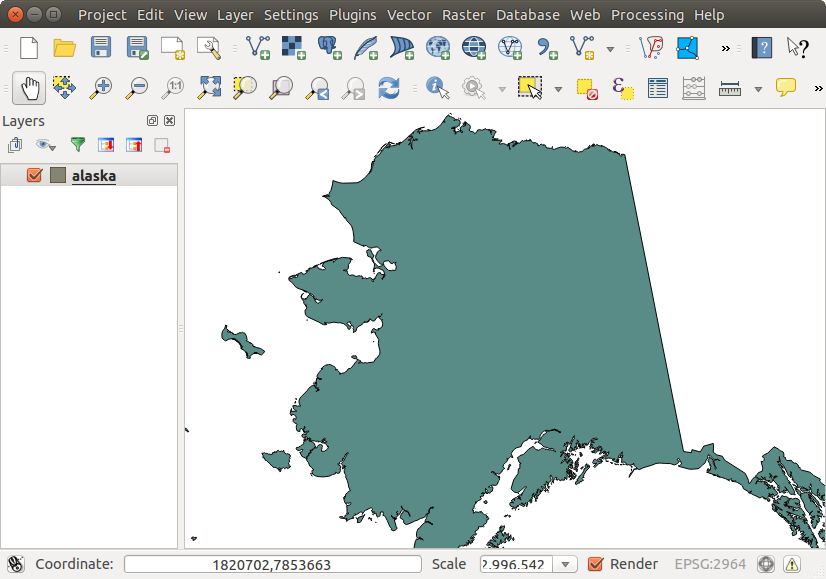
QGIS with Shapefile of Alaska loaded
ちなみに
レイヤ色
地図にレイヤを追加するとランダムな色が割り当てられます.複数のレイヤを一度に追加することができますが,その場合それぞれのレイヤには異なる色が割り当てられます.
Once a shapefile is loaded, you can zoom around it using the map navigation tools. To change the style of a layer, open the Layer Properties dialog by double clicking on the layer name or by right-clicking on the name in the legend and choosing Properties from the context menu. See section スタイルメニュー for more information on setting symbology of vector layers.
ちなみに
OS Xで外部ドライブからレイヤとプロジェクトをロードする
OS Xでプライマリハードドライブ以外にマウントされるポータブルドライブは File ‣ Open Project に期待されているように表示されません.私たちはOSX-ネイティブopen/saveダイアログを作ることでこの問題を解決しました.ファイル名ボックスで作業するときに ‘/Volumes’ と打ち込んでから return を押してください. そうすると外部ドライブやネットワークマウントの中を見ることができます.
Improving Performance for Shapefiles
To improve the performance of drawing a shapefile, you can create a spatial index. A spatial index will improve the speed of both zooming and panning. Spatial indexes used by QGIS have a .qix extension.
これらの手順でインデックスを作成できます:
- Load a shapefile by clicking on the Add Vector Layer
toolbar button or pressing Ctrl+Shift+V.
- Open the Layer Properties dialog by double-clicking on the shapefile name in the legend or by right-clicking and choosing Properties from the context menu.
- In the General tab, click the [Create Spatial Index] button.
Problem loading a shape .prj file
If you load a shapefile with a .prj file and QGIS is not able to read the coordinate reference system from that file, you will need to define the proper projection manually within the General tab of the Layer Properties dialog of the layer by clicking the [Specify...] button. This is due to the fact that .prj files often do not provide the complete projection parameters as used in QGIS and listed in the CRS dialog.
For the same reason, if you create a new shapefile with QGIS, two different projection files are created: a .prj file with limited projection parameters, compatible with ESRI software, and a .qpj file, providing the complete parameters of the used CRS. Whenever QGIS finds a .qpj file, it will be used instead of the .prj.
Loading a MapInfo Layer
To load a MapInfo layer, click on the
Add Vector Layer toolbar button; or type Ctrl+Shift+V, change the
file type filter Files of type : to
‘Mapinfo File [OGR] (*.mif *.tab *.MIF *.TAB)’ and select the MapInfo layer you
want to load.
Loading an ArcInfo Binary Coverage
To load an ArcInfo Binary Coverage, click on the
Add Vector Layer toolbar button or press
Ctrl+Shift+V to open the Add Vector Layer dialog. Select
Directory as Source type. Change the
file type filter Files of type to
‘Arc/Info Binary Coverage’. Navigate to the directory that contains the
coverage file, and select it.
Similarly, you can load directory-based vector files in the UK National Transfer Format, as well as the raw TIGER Format of the US Census Bureau.
デリミテッドテキストファイル
表形式のデータは読みやすくシンプルなので広く共通に利用される形式です – データはプレインテキストエディタで閲覧や編集もできます. デリミテッドテキストファイルはそれぞれのカラムが指定された文字で区切られ各行がラインブレークで構成されている属性テーブルです. 通常最初の行にはカラム名が格納されます. 一般的なデリミテッドテキストファイルはそれぞれのカラムがコンマで区切られたCSVです (Comma Separated Values).
そのようなデータファイルは位置情報を2種類の形式で持つことができます:
点の座標を区切られたカラムとして持ちます
ウェルノウンテキスト(WKT)としてジオメトリをあらわします
QGIS allows you to load a delimited text file as a layer or ordinal table. But first check that the file meets the following requirements:
ファイルは区切り文字で区切られたフィールド名が記述されたヘッダ行が必要です. これはテキストファイルの先頭の行になければいけません.
ヘッダ行はジオメトリが定義されたカラムを持たなければいけません. これらのフィールドは任意の名前をつけられます.
x座標とy座標は(ジオメトリが座標で定義されている場合)数値である必要があります.座標系は重要ではありません.
As an example of a valid text file, we import the elevation point data file elevp.csv that comes with the QGIS sample dataset (see section サンプルデータ):
X;Y;ELEV
-300120;7689960;13
-654360;7562040;52
1640;7512840;3
[...]
このサンプルテキストファイルについての解説:
例のテキストファイルでは ; (セミコロン) を区切り文字として使っています.どんな文字でもフィールドの区切り文字として使うことができます.
最初の行はヘッダーです.それには X, Y および``ELEV``のフィールドが含まれています.
引用符(")はテキストフィールドを区切るのに使われません
X座標は``X`` フィールドに含まれています.
y座標は``Y``フィールドに含まれています.
デリミテッドテキストファイルをロードしています
Click the toolbar icon  Add Delimited Text Layer in the
Manage layers toolbar to open the Create a Layer from a
Delimited Text File dialog, as shown in figure_delimited_text_1.
Add Delimited Text Layer in the
Manage layers toolbar to open the Create a Layer from a
Delimited Text File dialog, as shown in figure_delimited_text_1.
Figure Delimited Text 1:
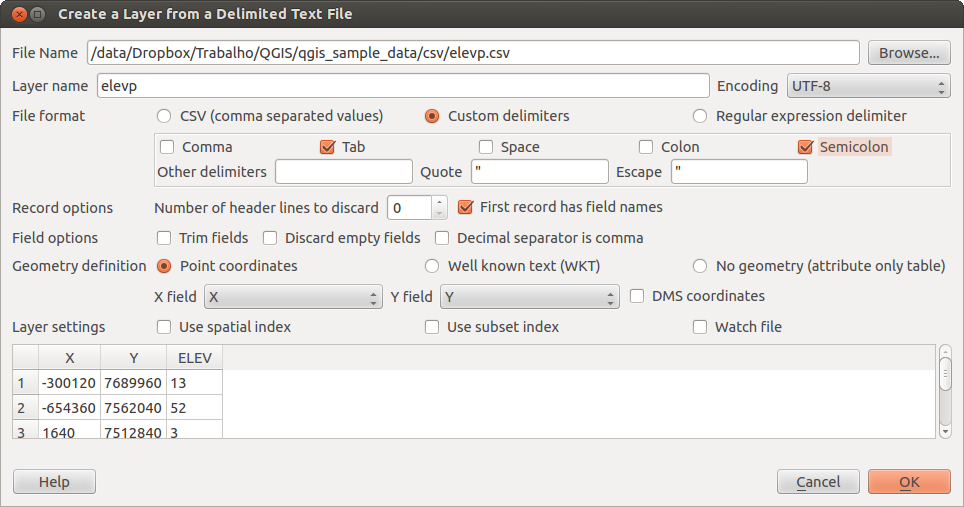
Delimited Text Dialog
First, select the file to import (e.g., qgis_sample_data/csv/elevp.csv)
by clicking on the [Browse] button. Once the file is selected, QGIS
attempts to parse the file with the most recently used delimiter. To enable QGIS to properly parse the
file, it is important to select the correct delimiter. You can specify a
delimiter by activating Custom delimiters, or by activating
Regular expression delimiter and entering
text into the Expression field. For example, to
change the delimiter to tab, use \t (this is a regular expression for the
tab character).
Once the file is parsed, set Geometry definition to
Point coordinates and choose the X and Y
fields from the dropdown lists. If the coordinates are defined as
degrees/minutes/seconds, activate the  DMS coordinates
checkbox.
DMS coordinates
checkbox.
Finally, enter a layer name (e.g., elevp), as shown in figure_delimited_text_1. To add the layer to the map, click [OK]. The delimited text file now behaves as any other map layer in QGIS.
フィールドの前と後の空白を除去するヘルパーオプションがあります — 前後の空白削除. またこのオプションも使えますAlso 空フィールドを削除. 必要ならばコンマを数字の桁区切り文字にすることができます コンマを小数点区切りに利用.
If spatial information is represented by WKT, activate the
Well Known Text option and select the field with the WKT definition for
point, line or polygon objects. If the file contains non-spatial data, activate
No geometry (attribute only table) and it will be
loaded as an ordinal table.
Additionaly, you can enable:
- 空間インデックスの利用 をチェックすると表示のパフォーマンスや空間条件での地物選択パフォーマンスを向上させます.
- サブセットインデックスの利用.
- Watch file to watch for changes to the file by other
applications while QGIS is running.
OpenStreetMap データ
In recent years, the OpenStreetMap project has gained popularity because in many countries no free geodata such as digital road maps are available. The objective of the OSM project is to create a free editable map of the world from GPS data, aerial photography or local knowledge. To support this objective, QGIS provides suppport for OSM data.
OpenStreetMapベクタの読み込み
QGIS integrates OpenStreetMap import as a core functionality.
OSM サーバに接続してデータをダウンロードするためにはメニューの ベクタ ‣ Openstreetmap ‣ Load data を選択して下さい. もし JOSMやOverpass APIや他のソースを使って .osm XMLファイルをすでに取得している場合はこのステップをスキップできます.
メニュー ベクタ‣ Openstreetmap ‣ XML からトポロジーインポート を使うと .osm ファイルを spatialite データベースに変換してdb接続を作成します.
- The menu Vector ‣ Openstreetmap ‣ Export topology to
SpatiaLite then allows you to open the database connection, select the type
of data you want (points, lines, or polygons) and choose tags to import.
This creates a SpatiaLite geometry layer that you can add to your
project by clicking on the
 Add SpatiaLite Layer toolbar button or by selecting the
Add SpatiaLite Layer... option
from the Layer menu (see section SpatiaLite レイヤ).
Add SpatiaLite Layer toolbar button or by selecting the
Add SpatiaLite Layer... option
from the Layer menu (see section SpatiaLite レイヤ).
PostGIS レイヤ
PostGIS layers are stored in a PostgreSQL database. The advantages of PostGIS are the spatial indexing, filtering and query capabilities it provides. Using PostGIS, vector functions such as select and identify work more accurately than they do with OGR layers in QGIS.
ストアドコネクションの作成
 The first time you use a PostGIS data source, you must
create a connection to the PostgreSQL database that contains the data. Begin by
clicking on the Add PostGIS Layer toolbar
button, selecting the Add PostGIS Layer...
option from the Layer menu, or typing Ctrl+Shift+D. You
can also open the Add Vector Layer dialog and select
Database. The Add PostGIS Table(s)
dialog will be displayed. To access the connection manager, click on the
[New] button to display the Create a New PostGIS Connection
dialog. The parameters required for a connection are:
The first time you use a PostGIS data source, you must
create a connection to the PostgreSQL database that contains the data. Begin by
clicking on the Add PostGIS Layer toolbar
button, selecting the Add PostGIS Layer...
option from the Layer menu, or typing Ctrl+Shift+D. You
can also open the Add Vector Layer dialog and select
Database. The Add PostGIS Table(s)
dialog will be displayed. To access the connection manager, click on the
[New] button to display the Create a New PostGIS Connection
dialog. The parameters required for a connection are:
Name: このコネクションの名前. Database と同じにすることも可能.
Service: hostname/port (それと利用可能データベース)の代わりに利用するサービスパラメータ. これはファイル pg_service.conf にも定義できます
- Host: Name of the database host. This must be a resolvable host name such as would be used to open a telnet connection or ping the host. If the database is on the same computer as QGIS, simply enter ‘localhost’ here.
Port: PostgreSQL データベースサーバが接続待ちをしているポート番号. デフォルトポートは5432 です.
データベース: データベースの名称
- SSL mode: How the SSL connection will be negotiated with the server. Note
that massive speedups in PostGIS layer rendering can be achieved by disabling
SSL in the connection editor. The following options are available:
Disable: 暗号化されていないSSL接続の場合のみ試みる
allow: SSLコネクションの試行に失敗した場合非SSLコネクションの試行をする.
prefer (デフォルトです): SSLコネクションを試行します.もし失敗したら非SSLコネクションを試行します.
require: SSLコネクションのみを試行します.
Username: データベースにログインするユーザー名.
Password: データベースに接続するために Username と一緒に利用するパスワード.
オプションで以下のチェックボックスをアクティブにできます:
- ユーザ名の保存
- パスワードの保存
- :guilabel: geometry_columns テーブルの中のみを参照する
- 制限されていないカラム(GEOMETRY)の型解決を行わない
- :guilabel:` ‘public’ スキーマのみを参照する`
- ジオメトリを持たないテーブルもリストする
- 推定されるテーブルメタデータを利用する
すべてのパラメータとオプションを設定した後で [接続テスト] ボタンをクリックして接続テストを行うことができます.
PostGIS レイヤの読み込み
Once you have one or more connections defined, you can
load layers from the PostgreSQL database. Of course, this requires having data in
PostgreSQL. See section PostgreSQLへのデータインポート for a discussion on
importing data into the database.
PostGISからレイヤをロードするには、以下のステップを実行します:
- If the Add PostGIS layers dialog is not already open,
selecting the Add PostGIS Layer...
option from the Layer menu or typing Ctrl+Shift+D
opens the dialog.
ドロップダウンリストから接続を選択して [Connect] をクリックして下さい.
- ジオメトリを持たないテーブルもリストする を選択または非選択にできます
オプションで
Search Options 使うとレイヤからどの地物をロードするか定義できます,また [Build query] ボタンを使うと Query builder ダイアログを開始できます.有効なレイヤリストからあなたが利用したいレイヤを探してください.
クリックすると選択できます. Shift キーを押しながらクリックすると複数のレイヤを選択することができます. PostgreSQLクエリビルダを使ってレイヤを高度に利用する方法についてはセクション クエリビルダー を参照して下さい.
[追加] ボタンをクリックし、マップにレイヤを追加します。
ちなみに
PostGIS レイヤ
Normally, a PostGIS layer is defined by an entry in the geometry_columns table. From version 0.9.0 on, QGIS can load layers that do not have an entry in the geometry_columns table. This includes both tables and views. Defining a spatial view provides a powerful means to visualize your data. Refer to your PostgreSQL manual for information on creating views.
PostgreSQLレイヤに関する詳細情報
This section contains some details on how QGIS accesses PostgreSQL layers. Most of the time, QGIS should simply provide you with a list of database tables that can be loaded, and it will load them on request. However, if you have trouble loading a PostgreSQL table into QGIS, the information below may help you understand any QGIS messages and give you direction on changing the PostgreSQL table or view definition to allow QGIS to load it.
QGIS requires that PostgreSQL layers contain a column that can be used as a unique key for the layer. For tables, this usually means that the table needs a primary key, or a column with a unique constraint on it. In QGIS, this column needs to be of type int4 (an integer of size 4 bytes). Alternatively, the ctid column can be used as primary key. If a table lacks these items, the oid column will be used instead. Performance will be improved if the column is indexed (note that primary keys are automatically indexed in PostgreSQL).
If the PostgreSQL layer is a view, the same requirement exists, but views do not have primary keys or columns with unique constraints on them. You have to define a primary key field (has to be integer) in the QGIS dialog before you can load the view. If a suitable column does not exist in the view, QGIS will not load the layer. If this occurs, the solution is to alter the view so that it does include a suitable column (a type of integer and either a primary key or with a unique constraint, preferably indexed).
QGIS offers a checkbox Select at id that is activated by default. This option gets the ids without the attributes which is faster in most cases. It can make sense to disable this option when you use expensive views.
ちなみに
Backup of PostGIS database with layers saved by QGIS
If you want to make a backup of your PostGIS database using the pg_dump and pg_restore commands the default layer styles as saved by QGIS are failing to restore afterwards. You need to set the XML option to DOCUMENT and the restore will work.
PostgreSQLへのデータインポート
Data can be imported into PostgreSQL/PostGIS using several tools, including the SPIT plugin and the command line tools shp2pgsql and ogr2ogr.
DBマネージャ
QGIS comes with a core plugin named  DB Manager. It can
be used to load shapefiles and other data formats, and it includes support for
schemas. See section DB マネージャプラグイン for more information.
DB Manager. It can
be used to load shapefiles and other data formats, and it includes support for
schemas. See section DB マネージャプラグイン for more information.
shp2pgsql
PostGISはshapefileをPostGISにインポートする shp2pgsql というユーティリティを持っています. 例えば lakes.shp というshapefileを gis_data というPostgreSQLデータベースにインポートする場合以下のコマンドを使って下さい:
shp2pgsql -s 2964 lakes.shp lakes_new | psql gis_data
ここで gis_data データベースに lakes_new という名前の新しいレイヤが作成されます. 新しいレイヤは2964という空間参照識別子 (SRID) を持ちます. 空間参照システムと投影についてはセクション 投影法の利用方法 を参照して下さい.
ちなみに
PostGISからデータセットをエキスポートする
インポートツール shp2pgsql と同じように PostGIS-データセットをshapefileとしてエキスポートするツールがあります: pgsql2shp. これはあなたのPostGISディストリビューションと一緒に出荷されています.
ogr2ogr
Besides shp2pgsql and DB Manager, there is another tool for feeding geodata in PostGIS: ogr2ogr. This is part of your GDAL installation.
shapefileをPostGISにインポートする手順は以下のとおりです:
ogr2ogr -f "PostgreSQL" PG:"dbname=postgis host=myhost.de user=postgres
password=topsecret" alaska.shp
これによって shapefile alaska.shp を サーバ myhost.de. の PostGISデータベース postgis にユーザ postgres パスワード topsecret でインポートします.
注 PostGISをサポートする場合はOGRがPostgreSQLを組み込んでビルドされていなければなりません.次のようにタイプすると確認できます( の場合)
ogrinfo --formats | grep -i post
もしデフォルトの INSERT INTO メソッドの代わりに PostgreSQLの COPY -command を使いたい場合は以下の環境変数をエキスポートすることができます(少なくても と  の場合は可能です):
export PG_USE_COPY=YES
ogr2ogr は shp2pgsl のように空間インデックスを作成しません. 空間インデックスを作るためには特別ステップとして手動で通常のSQLコマンド CREATE INDEX を発行する必要があります (次のセクション パフォーマンスの改善 で説明しています).
パフォーマンスの改善
Retrieving features from a PostgreSQL database can be time-consuming, especially over a network. You can improve the drawing performance of PostgreSQL layers by ensuring that a PostGIS spatial index exists on each layer in the database. PostGIS supports creation of a GiST (Generalized Search Tree) index to speed up spatial searches of the data (GiST index information is taken from the PostGIS documentation available at http://postgis.refractions.net).
GISTインデックス作成シンタックスは次のとおりです
CREATE INDEX [indexname] ON [tablename]
  USING GIST ( [geometryfield] GIST_GEOMETRY_OPS );
注 巨大テーブルでインデックスを作ると長い時間がかかります.一度インデックスを作成したら VACUUM ANALYZE を実行する必要があります. 詳しくは PostGIS ドキュメンテーション (POSTGIS-PROJECT 文献とWeb参照) を見て下さい.
以下はGISTインデックス作成の例です
gsherman@madison:~/current$ psql gis_data
Welcome to psql 8.3.0, the PostgreSQL interactive terminal.

Type:  \copyright for distribution terms
       \h for help with SQL commands
       \? for help with psql commands
       \g or terminate with semicolon to execute query
       \q to quit

gis_data=# CREATE INDEX sidx_alaska_lakes ON alaska_lakes
gis_data-# USING GIST (the_geom GIST_GEOMETRY_OPS);
CREATE INDEX
gis_data=# VACUUM ANALYZE alaska_lakes;
VACUUM
gis_data=# \q
gsherman@madison:~/current$
経度 180° をまたぐベクタレイヤ
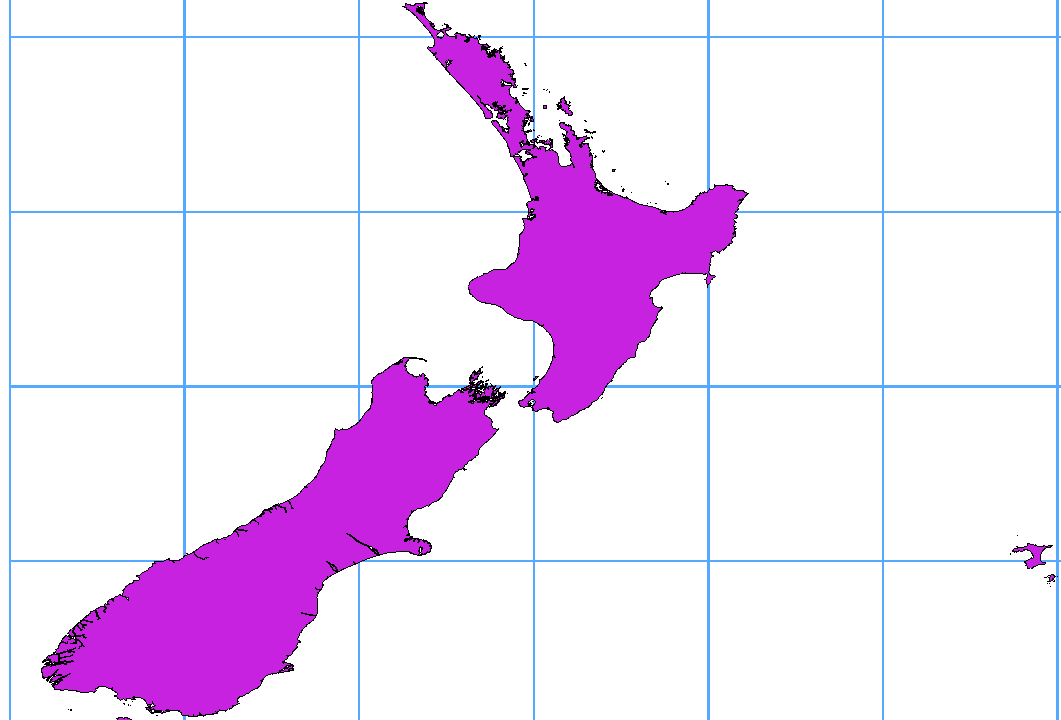
Many GIS packages don’t wrap vector maps with a geographic reference system (lat/lon) crossing the 180 degrees longitude line (http://postgis.refractions.net/documentation/manual-2.0/ST_Shift_Longitude.html). As result, if we open such a map in QGIS, we will see two far, distinct locations, that should appear near each other. In Figure_vector_4, the tiny point on the far left of the map canvas (Chatham Islands) should be within the grid, to the right of the New Zealand main islands.
Figure Vector 4:

Map in lat/lon crossing the 180° longitude line
この問題の回避方法は経度の値を PostGIS の ST_Shift_Longitude 関数を使って変換することです この関数はジオメトリのそれぞれの地物のコンポーネント中の点/頂点を読んで,それの経度が < 0° の場合 360° を加算します. その結果は 0° - 360° の間になり 180° が中心の地図にプロットできます.
Figure Vector 5:
経度 180° をまたぐため ST_Shift_Longitude 関数の適用した結果
利用方法
DBマネージャプラグインを利用したPostGIS (PostgreSQLへのデータインポート) へのデータインポート例.
PostGISコマンドラインインターフェースを利用して以下のコマンドを発行して下さい (これは例で “TABLE” のところはあなたのPostGISテーブルの実際の名前にして下さい): gis_data=# update TABLE set the_geom=ST_Shift_Longitude(the_geom);
すべてがうまくいけば更新された地物の数についての確認を求められます,それから地図をロードして違いを見ることができるでしょう (Figure_vector_5).
SpatiaLite レイヤ
The first time you load data from a SpatiaLite
database, begin by clicking on the
Add SpatiaLite Layer toolbar button, or by selecting the
Add SpatiaLite Layer... option
from the Layer menu, or by typing Ctrl+Shift+L.
This will bring up a window that will allow you either to connect to a
SpatiaLite database already known to QGIS, which you can choose from the
drop-down menu, or to define a new connection to a new database. To define a
new connection, click on [New] and use the file browser to point to
your SpatiaLite database, which is a file with a .sqlite extension.
ベクタレイヤをSpatiaLite形式で保存したい場合凡例でそのレイヤを右クリックして下さい. それから 名前をつけて保存.., を選択して出力ファイル名を指定して下さい, ‘SpatiaLite’ を形式として選択して CRSを指定して下さい. ‘SQLite’ を形式として選択することもできます, その場合 SPATIALITE=YES を OGR データソース作成オプションフィールドに指定して下さい. この指定で OGR に SpatiaLite データベースを作成することを伝えます. http://www.gdal.org/ogr/drv_sqlite.html も参照して下さい.
QGIS also supports editable views in SpatiaLite.
新規 SpatiaLite レイヤの作成
新しいSpatiaLiteレイヤを作成したい場合は 新規Spatialiteレイヤの作成. を参照して下さい.
ちなみに
SpatiaLite データ管理プラグイン
For SpatiaLite data management, you can also use several Python plugins: QSpatiaLite, SpatiaLite Manager or DB Manager (core plugin, recommended). If necessary, they can be downloaded and installed with the Plugin Installer.
MSSQL Spatial レイヤ
 QGIS also provides native MS SQL 2008 support. The first
time you load MSSQL Spatial data, begin by clicking on the
Add MSSQL Spatial Layer toolbar button or by
selecting the Add MSSQL Spatial Layer...
option from the Layer menu, or by typing Ctrl+Shift+M.
QGIS also provides native MS SQL 2008 support. The first
time you load MSSQL Spatial data, begin by clicking on the
Add MSSQL Spatial Layer toolbar button or by
selecting the Add MSSQL Spatial Layer...
option from the Layer menu, or by typing Ctrl+Shift+M.
Oracle Spatial レイヤ
The spatial features in Oracle Spatial aid users in managing geographic and location data in a native type within an Oracle database. QGIS now has support for such layers.
ストアドコネクションの作成
 The first time you use an Oracle Spatial data source,
you must create a connection to the database that contains the data. Begin by
clicking on the Add Orcale Spatial Layer toolbar
button, selecting the Add Orcale
Spatial Layer... option from the Layer menu, or typing
Ctrl+Shift+O. To access the connection manager, click on the [New]
button to display the Create a New Oracle Spatial Connection dialog.
The parameters required for a connection are:
The first time you use an Oracle Spatial data source,
you must create a connection to the database that contains the data. Begin by
clicking on the Add Orcale Spatial Layer toolbar
button, selecting the Add Orcale
Spatial Layer... option from the Layer menu, or typing
Ctrl+Shift+O. To access the connection manager, click on the [New]
button to display the Create a New Oracle Spatial Connection dialog.
The parameters required for a connection are:
Name: このコネクションの名前. Database と同じにすることも可能.
Database OracleインスタンスのSID または SERVICE_NAME.
- Host: Name of the database host. This must be a resolvable host name such as would be used to open a telnet connection or ping the host. If the database is on the same computer as QGIS, simply enter ‘localhost’ here.
Port: Oracle データベースサーバが接続待ちをしているポート番号. デフォルトポートは1521 です.
Username: データベースにログインするユーザー名.
Password: データベースに接続するために Username と一緒に利用するパスワード.
オプションで以下のチェックボックスをアクティブにできます:
- Save Username は接続構成にデータベースユーザ名を保存するかどうかを示しています.
- Save Password は接続構成にデータベースパスワードを保存するかどうかを示しています.
- Only look in meta data table は all_sdo_geom_metadata ビューに存在するテーブルのみ表示するように制限を行います. これをチェックすると空間情報テーブルの初期表示を高速化します.
- Only look for user’s tables 空間テーブルを検索する場合に指定ユーザが所有するテーブルのみを検索する制約.
- Also list tables with no geometry デフォルトでジオメトリを持たないテーブルもリストすることを示します.
- Use estimated table statistics for the layer metadata Oracleテーブルのレイヤ設定するときに様々なメタデータが必要です.ここにはテーブルの行数,ジオメトリタイプ,空間の領域等のデータが含まれます .テーブルの行数がとても多い場合このメタデータ作成に時間がかかります. このオプションを有効にすると以下の高速メタデータ操作が実行されます: 行数はall_tables.num_rows から取得されます. テーブルの領域はフィルターが適用されていても常に SDO_TUNE.EXTENTS_OF 関数で取得されます. テーブルのジオメトリは先頭のNULLでない100行のデータで判定されます.
- Only existing geometry types 存在しているジオメトリタイプのみリストを行い他の型の追加は行いません.
すべてのパラメータとオプションを設定した後で [接続テスト] ボタンをクリックして接続テストを行うことができます.
ちなみに
QGISユーザ設定とセキュリティ
Depending on your computing environment, storing passwords in your QGIS settings may be a security risk. Passwords are saved in clear text in the system configuration and in the project files! Your customized settings for QGIS are stored based on the operating system:
- 設定 はあなたのホームディレクトリの .qgis2/ に格納されます.
 設定はレジストリに格納されます.
ORACLE Spatial レイヤの読み込み
Once you have one or more connections defined, you can
load layers from the Oracle database. Of course, this requires having data in
Oracle.
ORACLE Spatialからレイヤをロードするには、以下のステップを実行してください:
- If the Add Oracle Spatial layers dialog is not already open,
click on the Add Oracle Spatial Layer toolbar
button.
ドロップダウンリストから接続を選択して [Connect] をクリックして下さい.
- ジオメトリを持たないテーブルもリストする を選択または非選択にできます
オプションで
Search Options 使うとレイヤからどの地物をロードするか定義できます,また [Build query] ボタンを使うと Query builder ダイアログを開始できます.有効なレイヤリストからあなたが利用したいレイヤを探してください.
クリックするとそれを選択できます. Shift キーを押しながらクリックすると複数のレイヤを選択することができます. PostgreSQLクエリビルダを使ってレイヤを高度に利用する方法についてはセクション クエリビルダー を参照して下さい.
[追加] ボタンをクリックし、マップにレイヤを追加します。
ちなみに
Oracle Spatial レイヤ
通常 ORACLE Spatial レイヤは USER_SDO_METADATA テーブルのエントリで定義されています.