.
Interpolation Plugin
The Interplation plugin can be used to generate a TIN or IDW interpolation of a point vector layer. It is very simple to handle and provides an intuitive graphical user interface for creating interpolated raster layers (see Figure_interpolation_1). The plugin requires the following parameters to be specified before running:
- Input Vector layers: Specify the input point vector layer(s) from a list of
loaded point layers. If several layers are specified, then data from all layers
is used for interpolation. Note: It is possible to insert lines or polygons as
constraints for the triangulation, by specifying either “points”, “structure
lines” or “break lines” in the Type
 combo box.
 - Interpolation attribute: Select the attribute column to be used for interpolation
or enable the
 Use Z-Coordinate checkbox to use the layer’s
stored Z values.
Use Z-Coordinate checkbox to use the layer’s
stored Z values. - Interpolation Method: Select the interpolation method. This can be either ‘Triangulated Irregular Network (TIN)’ or ‘Inverse Distance Weighted (IDW)’.
- Number of columns/rows: Specify the number of rows and columns for the output raster file.
- Output file: Specify a name for the output raster file.
- Add result to project to load the result into the map canvas.
Figure Interpolation 1:
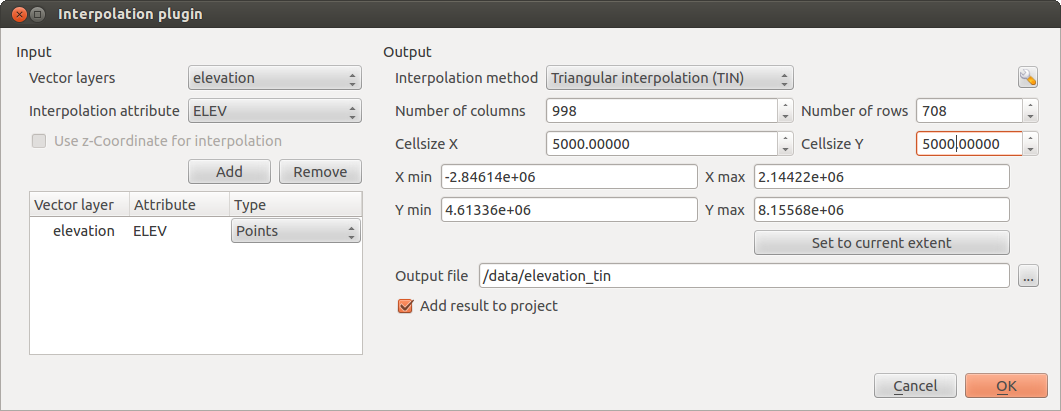
Interpolation Plugin 
Using the plugin
- Start QGIS and load a point vector layer (e.g., elevp.csv).
- Load the Interpolation plugin in the Plugin Manager (see
The Plugins Dialog) and click on the Raster ‣ Interpolation ‣
 Interpolation
, which appears in the QGIS menu bar. The Interpolation plugin dialog
appears as shown in Figure_interpolation_1.
Interpolation
, which appears in the QGIS menu bar. The Interpolation plugin dialog
appears as shown in Figure_interpolation_1. - Select an input layer (e.g., elevp ) and column
(e.g., ELEV) for interpolation.
- Select an interpolation method (e.g., ‘Triangulated Irregular Network (TIN)’), and specify a cell size of 5000 as well as the raster output filename (e.g., elevation_tin).
- Click [OK].